¶ FAF Terrain Shaders
¶ Introduction
When a game starts, the SupCom: FA engine loads the selected map and prepares it for play. Shaders, specialized code running on the GPU, control how the engine renders terrain, textures, and lighting. They define how surfaces interact with light, how different textures blend together, and how certain control textures are used (e.g. the masks that control the appearance of the texture layers).
Since the game’s release, significant advancements have been made in computer graphics, and fortunately, Forged Alliance is moddable enough that we could integrate some of these improvements. As such, FAF provides additional terrain shaders that modify the standard rendering process, allowing mapmakers new tricks to enhance visual quality. These shaders introduce improvements such as Physically Based Rendering (PBR) for more realistic lighting, advanced texture blending, and custom mask ranges that fix inconsistencies in older shaders. By choosing the correct shader for your design, you can fine-tune how terrain appears, creating more detailed and visually appealing environments.
This page explains the available shaders, their naming conventions, how they differ from the default options, and the important components needed for their function.
Changing shaders is considered an advanced part of FAF mapping. Consequently, this page of the wiki assumes you have a good grasp of basic mapping, and have a basic understanding of the mapping terminology, how normal textures work, how images consist of multiple channels of information, and how you can edit these channels.
¶ The default shaders
¶ TTerrain
The TTerrain shader is the default terrain shader used in the original GPG maps. It supports only four strata and has a white specular color, meaning that light reflections from surfaces will always appear white rather than taking on the color of the texture. The intensity of these reflections is controlled by the inverted alpha value of the albedo texture—a fully opaque texture (alpha = 1) results in no specular reflection, while a fully transparent texture (alpha = 0) produces the strongest reflection.
The TTerrain shader reserves the upper stratum for macro textures. Textures in this channel are laid on top of all other layers and interpret the alpha channel as opacity. Textures designed by GPG for this purpose typically include "macrotexture" in their name. These macro textures are used to reduce visible texture repetition. Texture repetition can be visually distracting, and is a consequence of the way that the textures have to be tiled often to ensure a high enough pixel density on the terrain. This is a fairly common problem in computer graphics. The macro variation is provided by an additional texture that is laid over the terrain in a much bigger scale to break up the repeating pattern of the smaller textures with color variation.
Unfortunately, the TTerrain shader has a known issue with how it interprets the stratum mask. While the normal texture correctly follows the mask's opacity, the albedo texture only recognizes values from 128 to 255, treating anything below 128 as fully transparent. This inconsistency can lead to unexpected behavior when painting terrain strata, where the normal texture may be visible even when no albedo texture appears. When working with this shader, this limitation must be taken into account.
¶ TTerrainXP
The TTerrainXP shader is used in most community-made maps and supports eight texture strata. Unlike TTerrain, it features an RGB specular color, meaning you can globally set the reflection color instead of always appearing white. However, a key difference is how specular intensity is controlled—here, the regular alpha value of the albedo texture determines the strength of the reflection, rather than the inverted alpha value used in TTerrain. Like TTerrain, TTerrainXP includes an upper stratum that can be used for macro textures to help reduce visible texture repetition.
TTerrainXP shares the same stratum mask issue as TTerrain—the normal texture follows the full mask range, while the albedo texture only recognizes values from 128 to 255, treating anything below 128 as fully transparent. This inconsistency should be considered when working with this shader.
¶ FAF shaders
Because the vast majority of the maps in the FAF mapping vault use the two basic shaders, making any adjustments to these shaders to fix underlying issues would affect these maps in possibly harmful ways. For this reason, new FAF original shaders have been introduced to fix these issues, and offer several more advanced shading techniques.
¶ Improvements over the default shaders
The new FAF shaders were developed with the aim of improving the following five main features:
- Properly working terrain shadows;
Previously, terrain shadows could only be faked with decals, which could lead to flickering and overlapping double shadows where units would cast their shadow on top of the shadow decal. - More details in the terrain;
More and more people are working with tools like World Machine and Gaea that can procedurally generate realistic terrain in high resolution. We can't improve the resolution of the actual terrain geometry, but we can bake the high resolution terrain into a normal map that we can use to fake the detail.
Previously this was also only possible with decals that had their drawbacks, like drowning out the stratum normals and flickering. - Better lighting;
In 2011 Physically Based Rendering (PBR) emerged, which is now the go-to standard in computer graphics. PBR makes surfaces react to light in a realistic way, which produces beautiful specular reflections. - Better texture blending;
The default linear texture blending often results in blurry transitions. Height-based texture blending sharpens these transitions for a more detailed appearance. - Fix any issues that have been part of the default shaders for some time;
Specifically, the bug related to the wrong interpretation of the stratum mask.
These new features need new inputs in the form of textures to function properly. The following sections describe the new textures and how to create them.
¶ Terrain Info Texture
The Terrain Info Texture is a particular file that stores information about the terrain shadows, ambient occlusion, and the water depth. This Terrain Info Texture is loaded into the albedo slot of layer 8, just below the upper layer.
You can easily generate the Terrain Info Texture with the map editor (Textures > Tools > Generate Terrain Info Texture). Advanced mappers may want to create the terrain info texture with external tools, as that would allow them to include more details. Instructions on how to accomplish this can be found further down the page.
¶ Terrain Normal Texture
The Terrain Normal Texture stores the normals of the entire terrain. This way we can introduce additional details by using a higher resolution than the terrain has. The Terrain Normal Texture is loaded into the normal slot of layer 8, just below the upper layer.
You can easily generate a basic version of the Terrain Normal Texture with the map editor (Textures > Tools > Generate Terrain Normal Texture). Advanced mappers may want to create the terrain Normal texture with external tools, as that would allow them to include more details. Instructions on how to accomplish this can be found further down the page.
¶ The PBR Texture Atlas
Those shaders that use PBR algorithms or better texture blending require a so-called texture atlas, which contains information on the roughness and blending properties of the terrain layers. A texture atlas is simply a texture that contains multiple other textures. As the engine has a limit on how many textures it can load, it is important to minimize the amount of textures in use. We do this by merging all the height and roughness maps of the strata into one big texture. The PBR texture atlas is loaded into the upper layer.
The stratum mask of stratum 8 gives you the ability to tweak the roughness of the terrain. The editor provides a button (Textures > Tools > Reset Roughness Mask) to initialize the mask with a 0.5 value. This is the neutral value. Higher values will increase the roughness, lower values will decrease it and make it more glossy. This way you can vary the roughness on your map, for example to create the impression of drier or wetter areas.
¶ Roughness maps
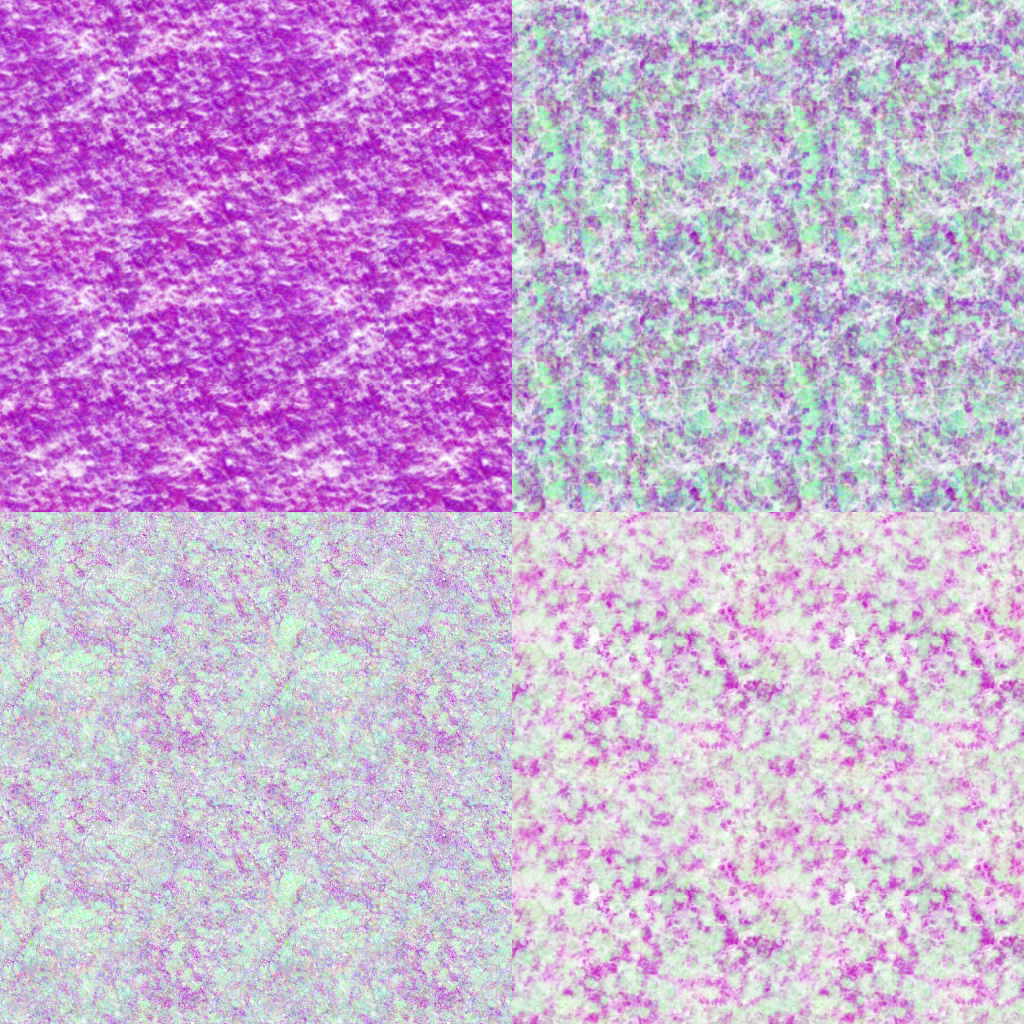
 Physically based rendering (PBR) allows for improved reflections and light effects. Using this technique, terrain will react to light in a physically plausible way, in contrast to the rudimentary specular reflections that the game originally features. PBR uses so-called roughness maps to control the effect. These are textures that define how rough or smooth a surface is and thus how matte or glossy it appears. When Forged Alliance was released PBR was not even invented yet. Consequently, the game did not ship with roughness maps, so you need to provide them yourself. A crude method to make them is to use an albedo texture as a base and to tweak the values until you get something passable, but the easier (and higher quality) way is to search online. As PBR is a common technique, many websites offer free textures that you may use for this purpose, provided that these textures come with a license that allows their use in projects such as FAF.
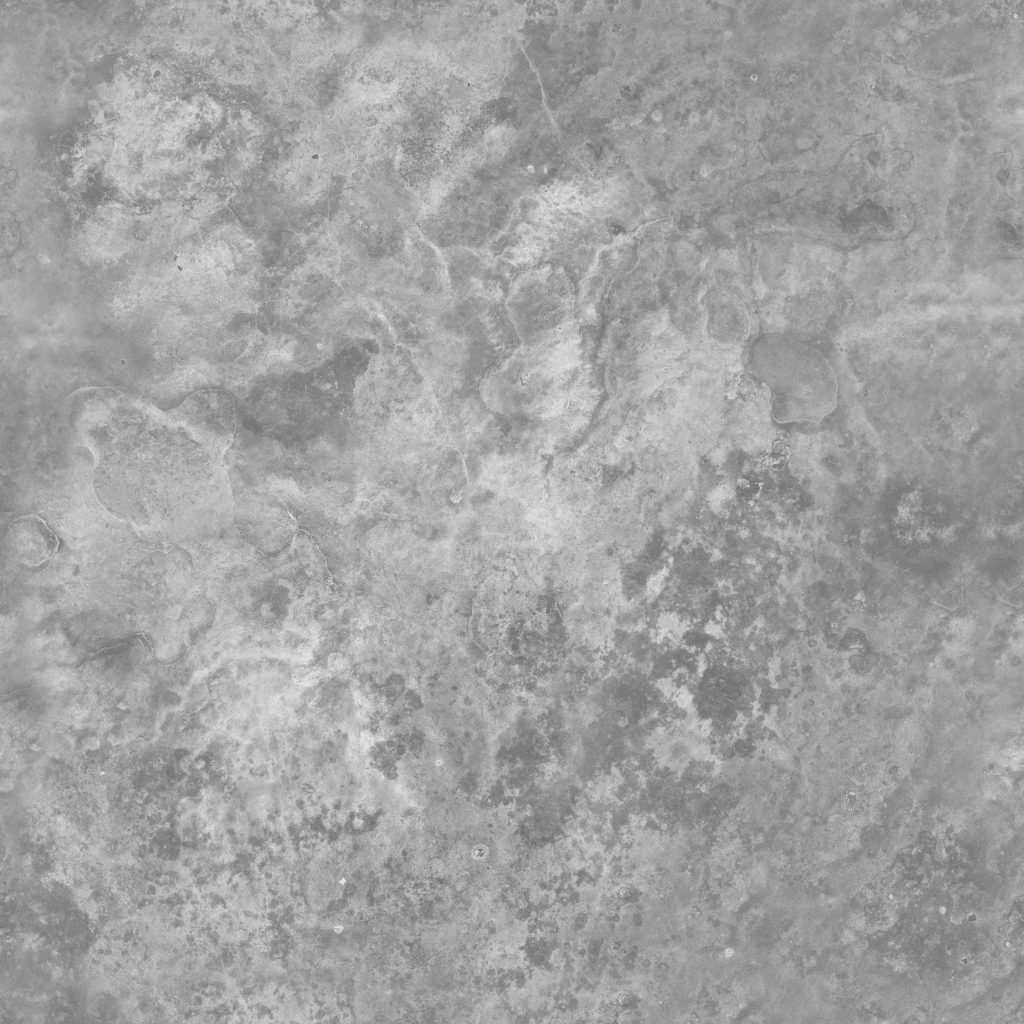
On the right you can see an example of a rougness map. A roughness map is always grayscale as it only provides one dimension of information.
¶ Height Maps for height-based texture blending.
By default the game blends linearly between texture strata, which creates a very soft and washed-out look. The transition between textures can be significantly improved by using a heightmap that stores information about the height of the material that the texture represents.
When blending the textures the height information is evaluated and the texture with higher height is chosen for display. If you have for example a sand material and some big rocks as the other material, then the sand will first show up in the crevices between the rocks and will occupy more and more of the area until only the highest tops of the rocks stick out of the sand. The transition between the rock and the sand texture is always relatively sharp, which creates a lot of details.
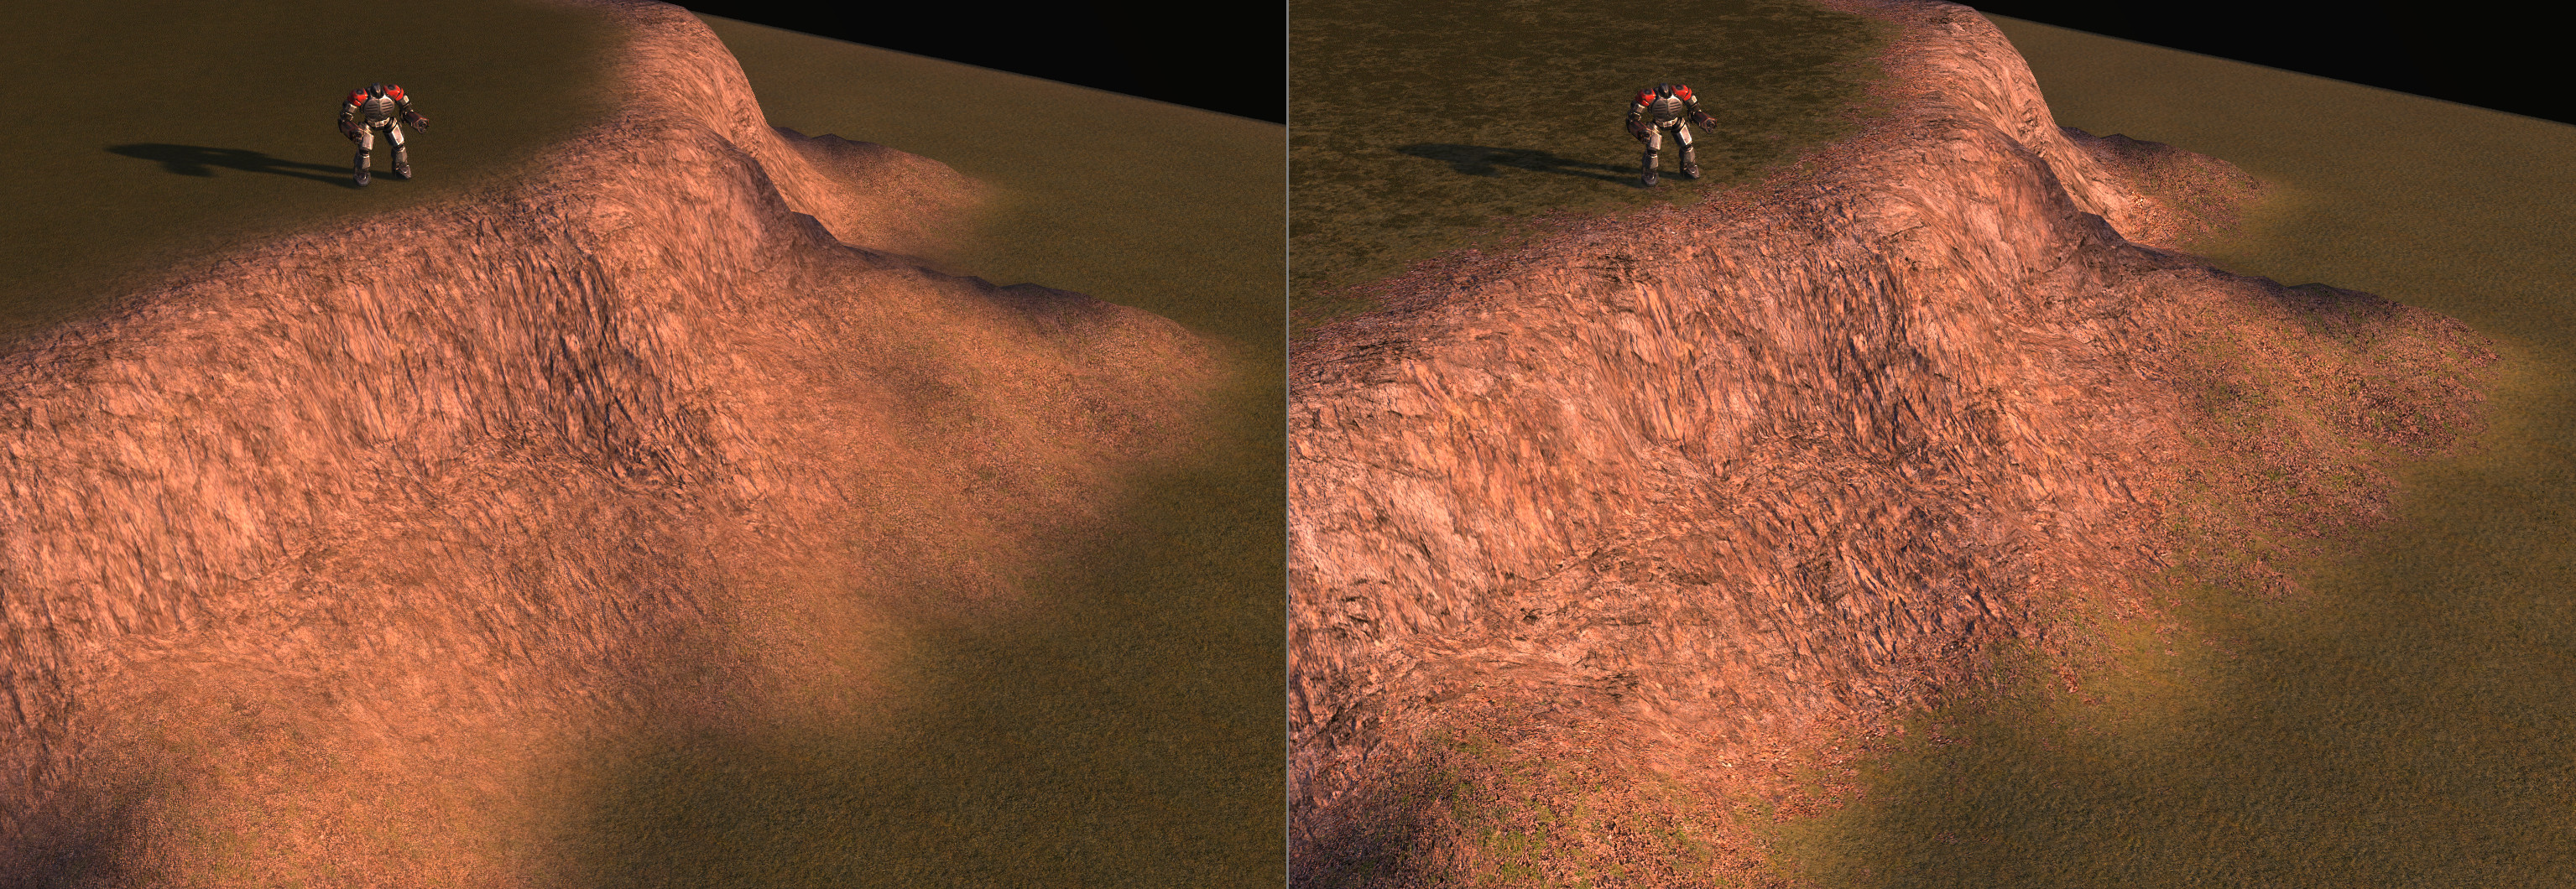
You can see the difference between the blending approaches in the two images here. You can find an in-depth explanation and more images here.
 To control the effect we need a texture that stores the height information. Again, the game did not ship with height maps, so you need to provide them yourself. A crude method to make them is to use an albedo texture as a base and to tweak the values until you get something passable, but the easier (and higher quality) way is to search online. Many PBR materials also provide a height texture, it is often called the displacement texture. Alternatively, these textures can be made by yourself using software such as Gaea.
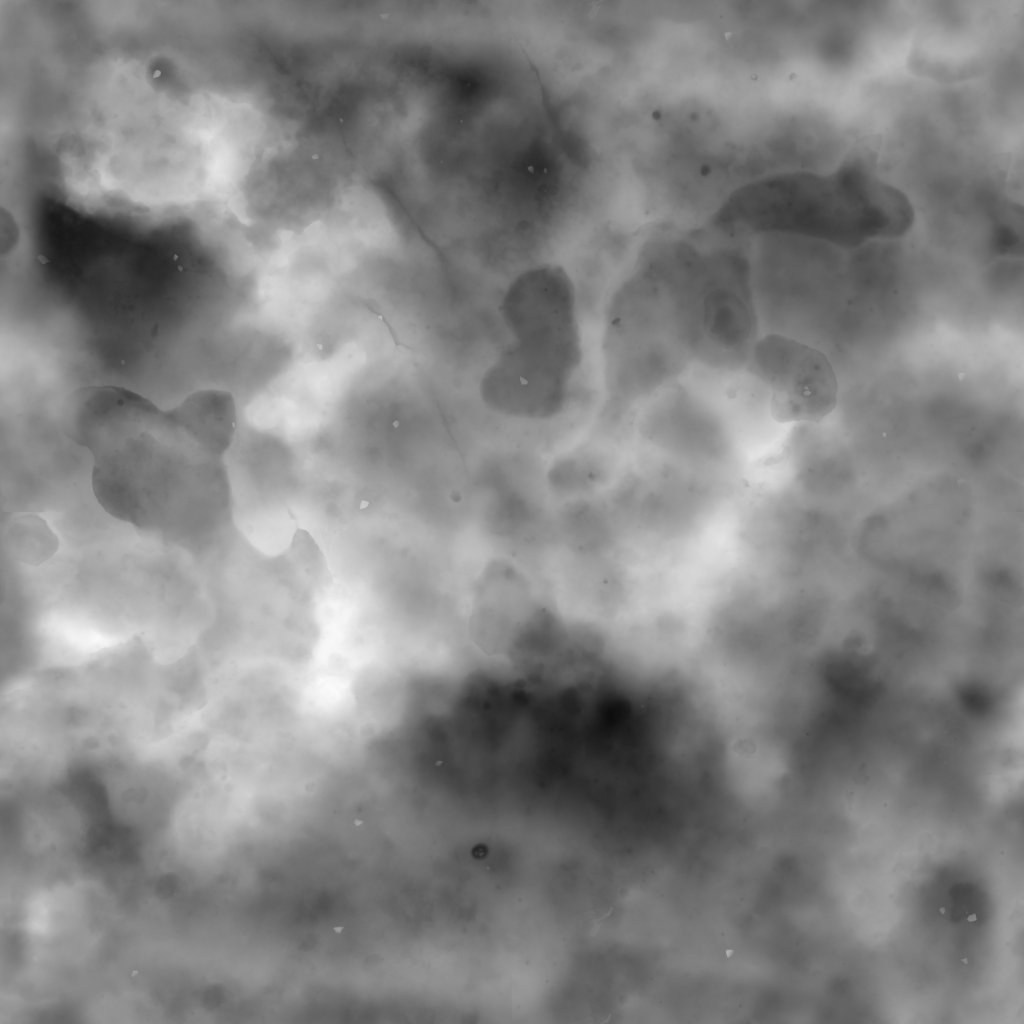
On the right you can see an example of a height map. A heihgt map is always grayscale as it only provides one dimension of information.
Make sure that the color range in the texture reaches from full black to full white. Otherwise you will limit the mask range where your stratum material appears on the map. This can make it frustrating when trying to paint the stratum with the brush. Use an image editor to Inspect the histogram of your heightmap. It should go from fully black to fully white.
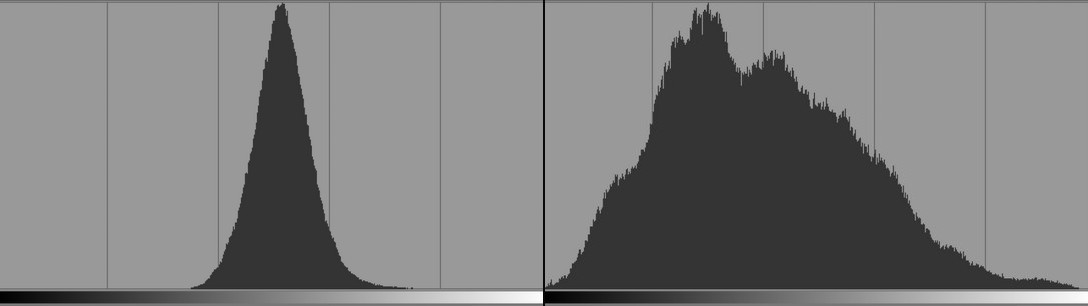
The example height map from above has the right histogram, which is good. But you can also find heightmaps online that have a histogram like shown on the left. In this case you have to tweak the values until they have the full range.
¶ Merging all the height and roughness maps into a texture atlas
The map editor can do this automatically for you. To be able to use this functionality you need to point the editor to a working Java environment. You can either install Java yourself or use the Java environment that ships with the FAF client. In the client install directory you can find the java.exe inside of jre\bin\. The full path is C:\Program Files\FAF Client\jre\bin\ if you installed the client in the default location.
You also need to specify the folder where you provide your textures. It can be any directory, but it should not be in your map directory, otherwise you will make your map needlessly large when you upload it. Drop all the height and roughness textures into the directory you chose and name them HeightX or RoughnessX where X is from 0 to 7. This tells the editor which stratum they are for. They don't need to be dds files, any common image file type should work.
Pressing the button “Generate PBR Texture” will create the texture atlas and place it in the correct slot. Depending on the size of your input textures this can take a while to complete.
You should also press the button “Reset Roughness Mask” to fill the mask with the default value. Otherwise the map will look extremely shiny.
Note that this file should be created again every time you modify one of the height and roughness textures. When you change the order of the stratum layers you also need to rename your textures accordingly and need to regenerate the atlas. The generated atlas will roughly look similar to this:
¶ Naming scheme
The new shaders are organized by a naming scheme to make it easier to select the one you want and to allow the addition of even more shaders in the future. These new shaders are generally named 'Terrain' followed by a three-digit number, and allow advanced techniques such as PBR roughness and advanced splatting (which are explained below). Additionally, a drop-in replacement for TTerrainXP named “TTerrainXPExt” has been released.
The first digit shows the main category:
- Terrain0XX for shaders using legacy specularity calculations;
- Terrain1XX for shaders using PBR roughness;
- Terrain2XX for shaders using PBR roughness and height-based texture blending.
The second digit gives info about the mask range of the shader:
- TerrainX0X for shaders using the full mask range;
- TerrainX5X for shaders using only the upper half of the mask range.
The third and last digit is used for variations how the lower layer albedo gets blended on top:
- 0: no additional blending
- 1: lower layer albedo get’s blended on top with a linear interpolation based on the alpha channel of the lower albedo texture
- 2: lower layer albedo get’s blended on top by multiplying the albedo with the result of the rest of the layers. The alpha channel of the lower albedo texture controls the strength of the effect.
 There are also variations with biplanar mapping, where stratum layers 3 and 4 are mapped from the sides instead of the top. This makes it possible to easily texture mesa-like terrain or steep cliffs in general. These shaders have a “B” appended to their name to make them easier to recognize.
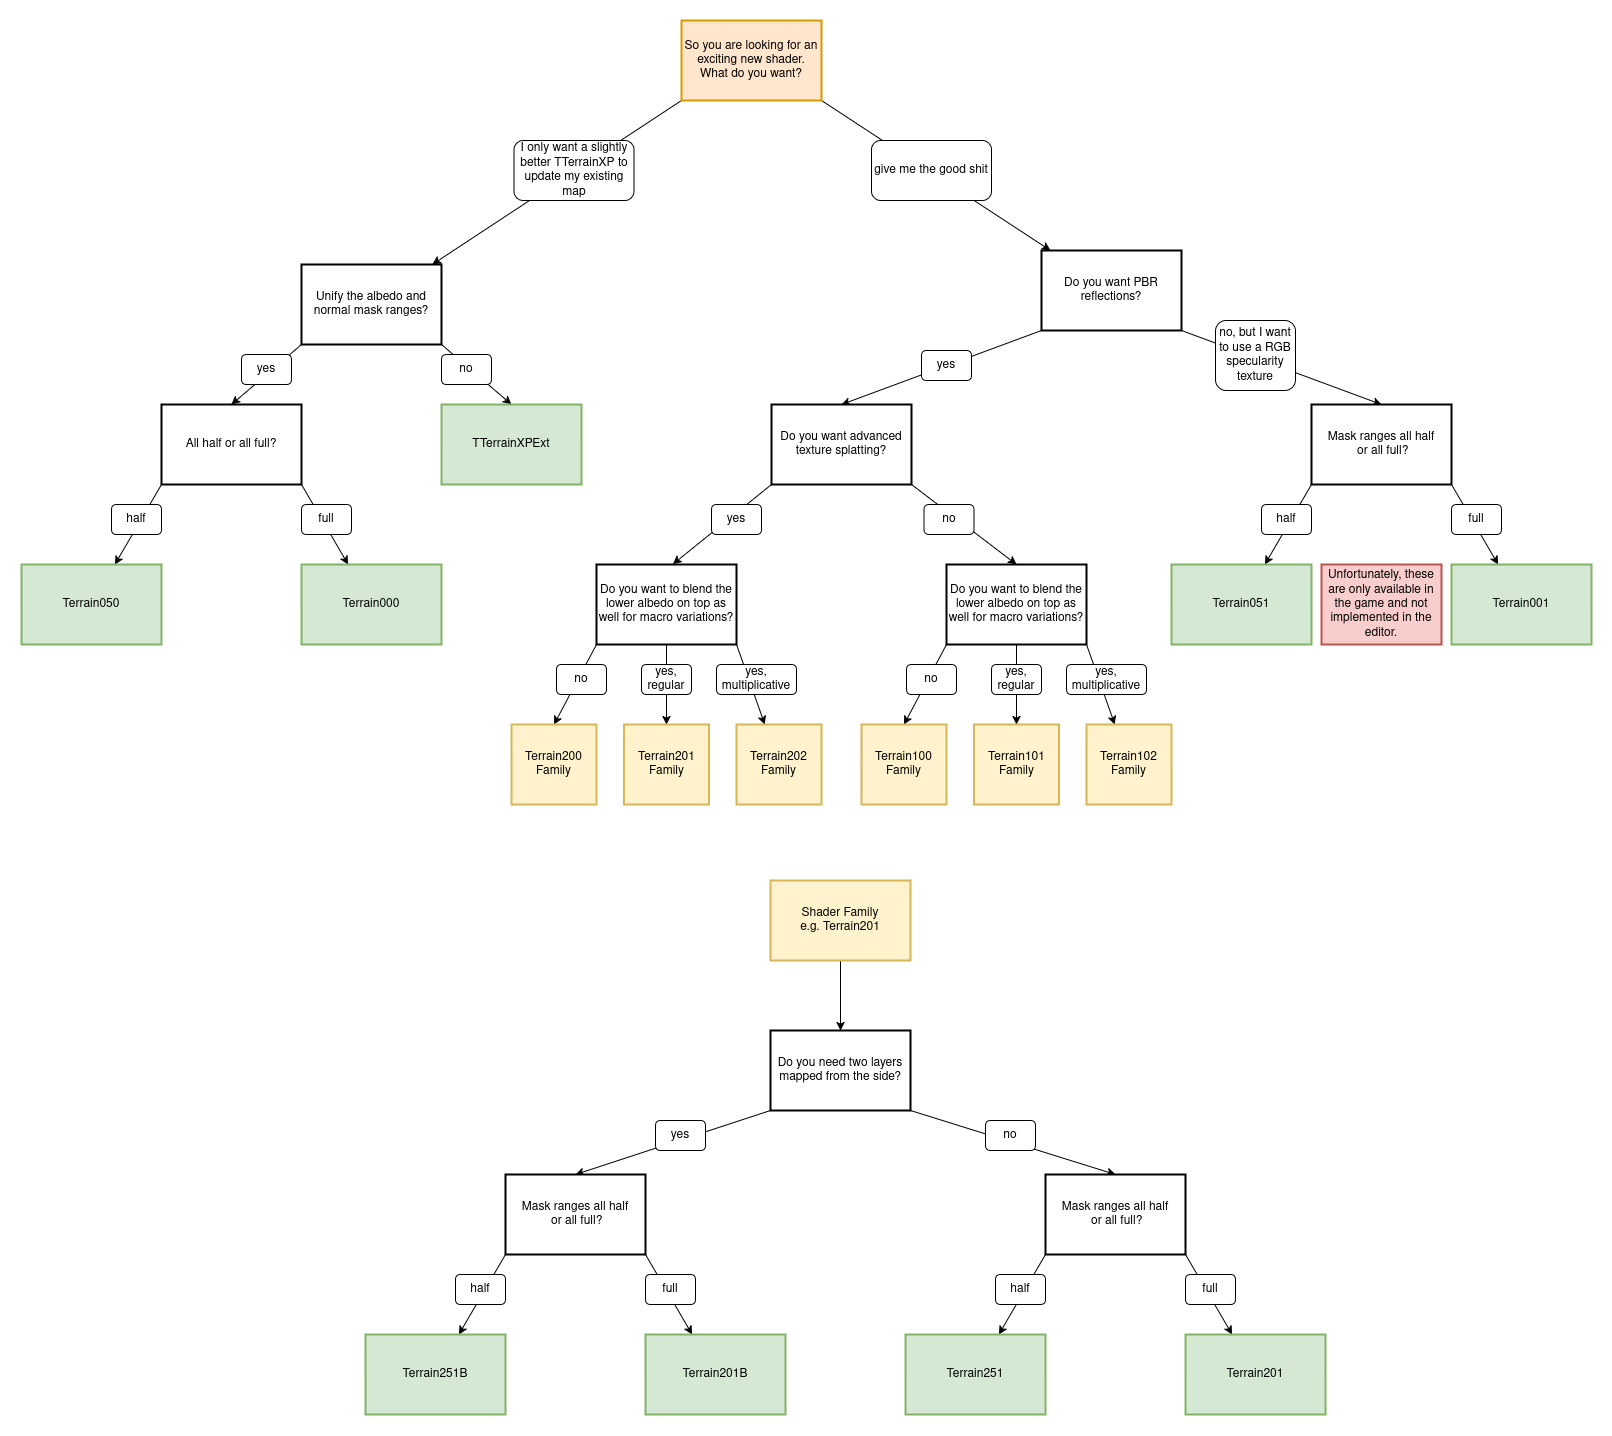
You can use the following chart to help you choose a shader.
¶ FAF shaders in detail
Use the following flow chart to get a better understanding of the options you have.
¶ TTerrainXPExt and its variants Terrain000 and Terrain050
“TTerrainXPExt” is designed as a drop-in replacement for TTerrainXP that solely introduces the terrain normal and info texture for map-wide normals and shadows. It keeps the half mask range for albedo strata and full mask range for normal strata, that’s why it doesn’t follow the regular naming scheme. Terrain000 and Terrain050 use consistent mask ranges according to the naming scheme i.e. full mask range for both albedo and normal textures with Terrain000 and half range for both with Terrain050.
¶ Terrain001 and Terrain051
The Terrain001 and Terrain051 shaders incorporate the UDN blending to improve how normal maps are blended across different texture strata. This technique preserves more details when blending multiple normal textures.
The RGBA channels of the upper stratum texture are used to define the specular reflection of the terrain, giving you more control over how light interacts with surfaces. The color of the specular light is based on the RGB channels, while the alpha channel controls the sharpness of the reflection. Higher values result in more focused reflections, while lower values create a softer, more diffused look. Additionally, the red channel of the specular color light setting in the light tab acts as a global multiplier for specular sharpness. This setting allows mappers to fine-tune the overall reflectivity of the terrain, balancing between sharp highlights and more matte surfaces.
¶ Terrain100 Family
The Terrain100 family of shaders uses Physically Based Rendering (PBR) to calculate how light should interact with the terrain.
¶ Terrain200 family
As with the Terrain100 family, these shaders use roughness textures for PBR rendering. Most importantly, these shaders use height-based texture blending, where the information from height maps is taken into account when blending the various strata. This results in more details in the areas where two stratums blend with each other.
Additionally, where normally textures are tiled in a grid horizontally and vertically aligned with the borders of the map, this shader rotates every other texture stratum by 30 degrees. This technique helps break up any visible texture repetition, something which may otherwise be hard to compensate for on highly detailed textures.
Height processing for the blending happens at two scales, for each layer, the albedo scale controls the near scale and the normal scale control the far scale. This is to help break up the visual repetition of the height map. We recommend setting the far scale to something around two to five times the near scale. Ideally you don’t use an even factor like 4, but instead something like 4.3 to maximize the least common multiple of the two numbers.
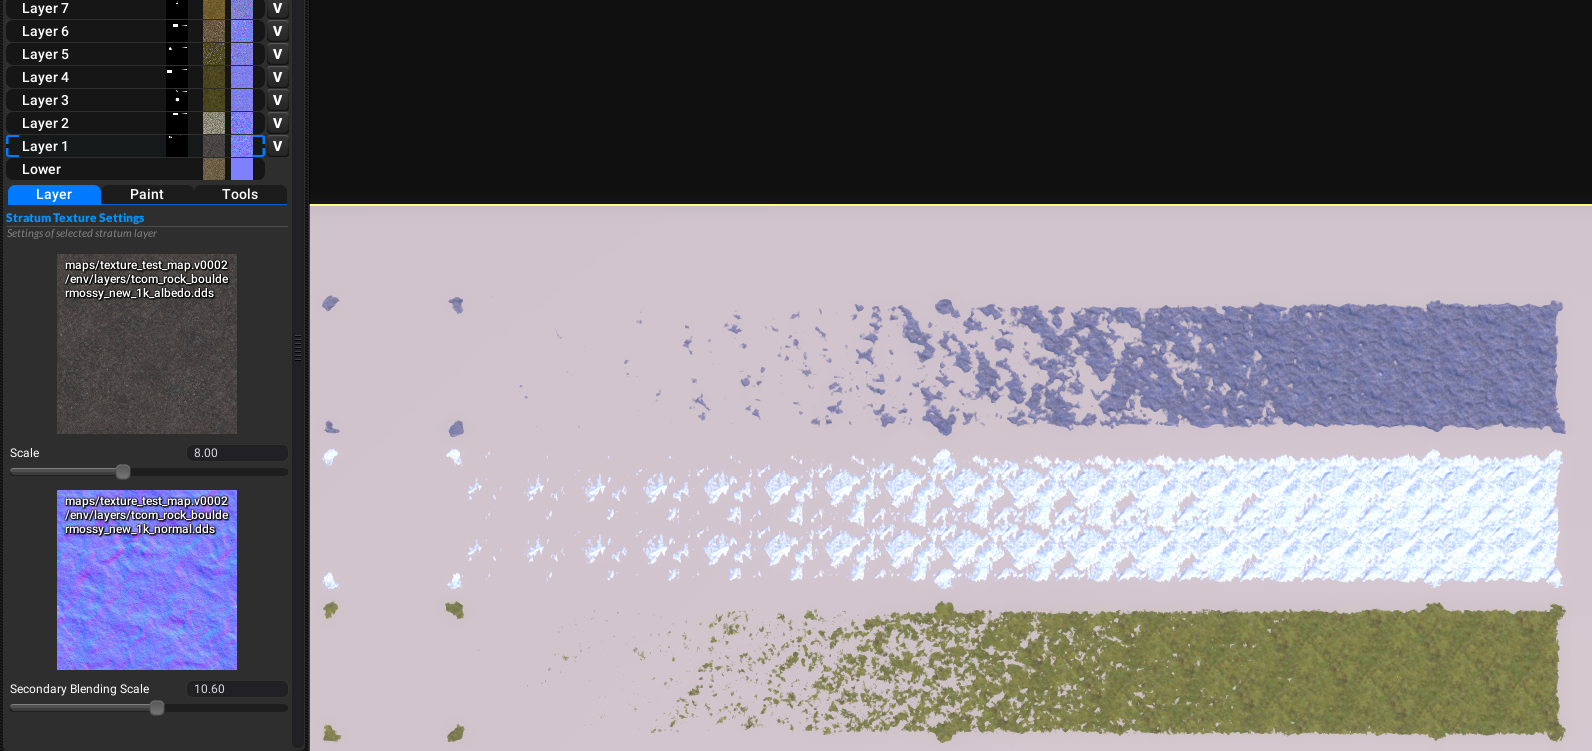 In the picture on the right you can see the benefit of this: Layer 2 uses identical blending scales. There is a noticeable repetition in the splatting of the texture. Layers 1 and 3 use different scales, so there is no visible repetition of the splatting. The map used is “Texture Test Map”. You can find it on the vault. It features smooth gradients of all texture layers to make it easy to play around with the height-based splatting.
You can control the blurriness of the texture blending. A too low blurriness can look artificial, a too high blurriness will look washed out. The perfect value depends on the textures you use and the look you want to go for.
¶ Selecting the shader in the editor
You can switch the shader that the map uses by typing the appropriate name in the shader text field in the editor (Map > General).
After you have done that, you need to provide the necessary textures, so the shader works correctly. For the Terrain200 shader family for example this entails creating the PBR texture atlas, the terrain normal texture and the terrain info texture. You can find buttons to generate each texture in the texture tab (Textures > Tools). You can also find a button there to set the roughness modifier mask (the texture mask of layer 8) to the neutral value of 0.5.
¶ Detailed info on the Terrain Info Texture and Terrain Normal Texture
For advanced mappers who want greater control over terrain shading and blending, it is possible to create custom textures using external tools. This allows for the inclusion of custom normal maps and fine-tuned ambient occlusion and shadow data.
The Terrain Info Texture is a four-channel image, where each channel encodes specific terrain data:
- Red (R): Ambient Occlusion / Water depth
- Green (G): Ambient Occlusion
- Blue (B): Ambient Occlusion
- Alpha (A): Shadow mask
Each of these channels must be configured correctly to ensure accurate rendering in-game.
¶ Ambient Occlusion Encoding
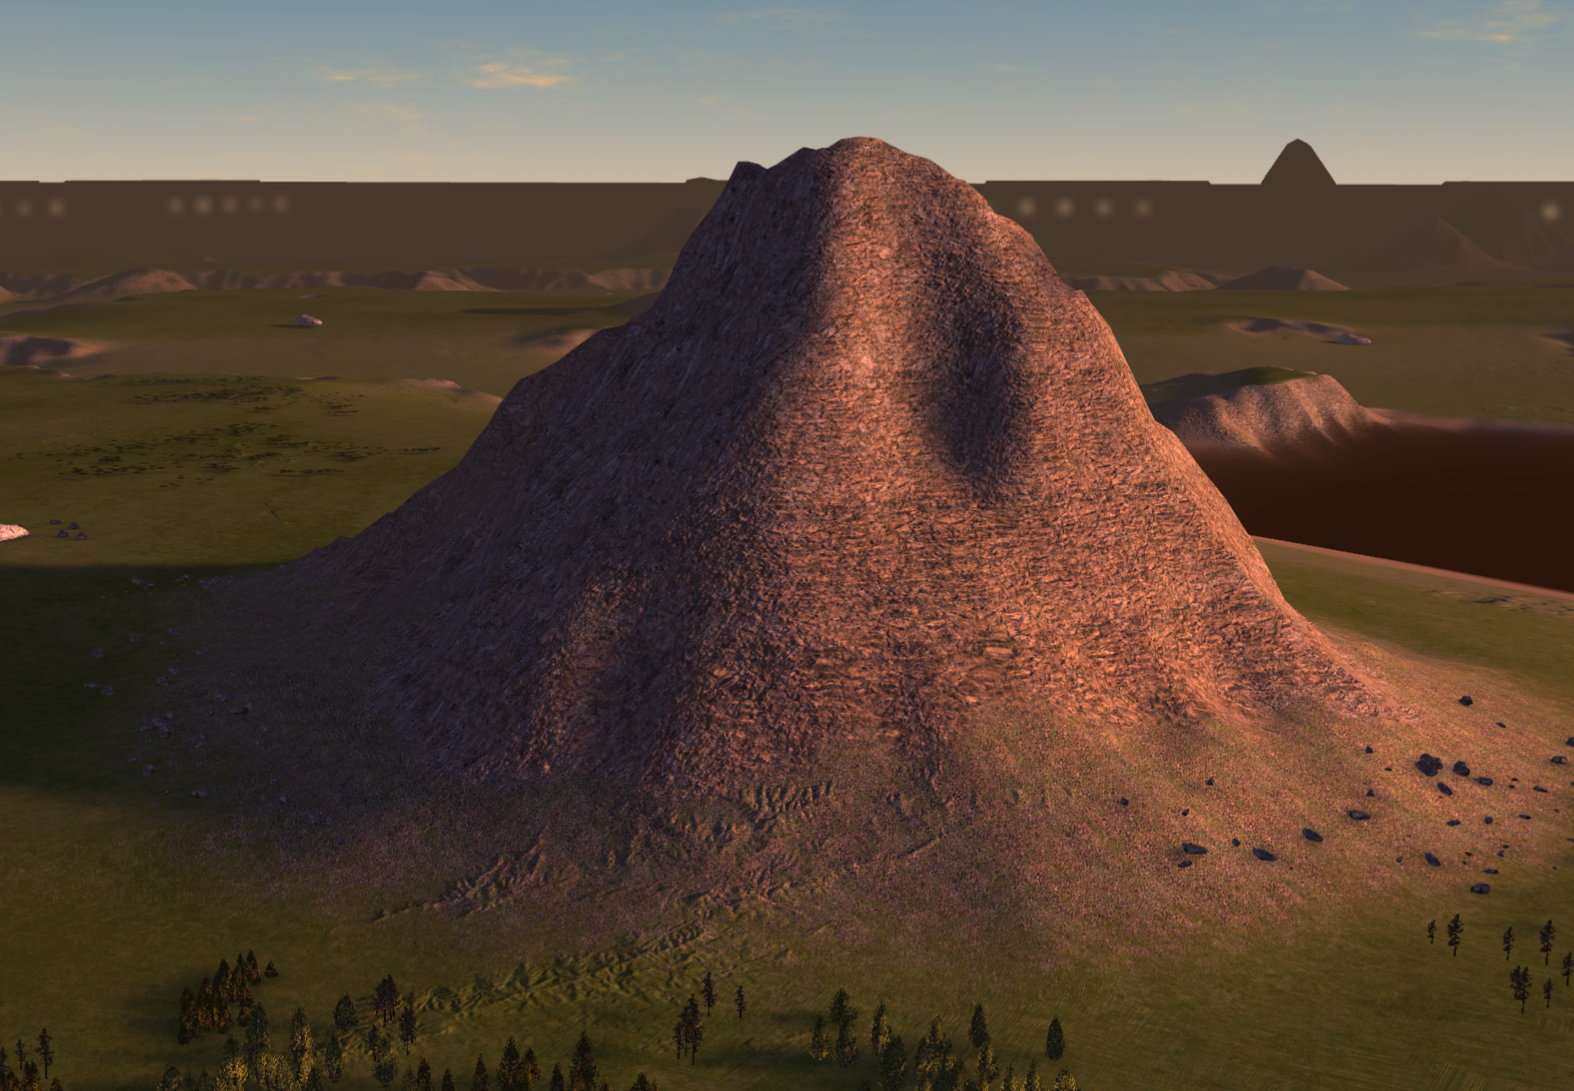
Ambient Occlusion (AO) defines how much of the sky is visible from any one point on the map. The occlusion reduces the amount of ambient light at that point and consequently makes ridges a bit darker.
- 0.0 full occlusion, no ambient light at all. This is only a theoretical value.
- 1.0 no occlusion, a flat plane, or the top of a mountain.
AO is an industry standard, so software like Blender can be used to render an AO texture. If you don’t want to provide one, fill the channel with pure white. The AO texture is encoded in all three color channels to use a trick with DDS encoding. This way you can save the texture with DXT5 (also called BC3) compression without any quality degradation.
¶ Water Depth Encoding
The red channel represents normalized water depth. It is only necessary due to technical reasons when using a shader with biplanar mapping. When not using a shader with biplanar mapping you can omit the water and store another copy of the AO instead. Depth values must be mapped as follows, and a linear interpolation should be used for depths between these values:
- 0.0 = Water surface and areas above water
- 1.0 = Maximum abyss depth and below
When using the water depth you should save the texture uncompressed to avoid compression artifacts. You can read more on DDS compression here.
¶ Shadow Map Encoding
The alpha channel stores shadow data. Light values must be mapped as follows, values in between only really make sense for antialiasing at the edges between shadow and sunlight, depending on how smooth you want the shadow to be:
- 0.0 = Areas in full shadow.
- 1.0 = Areas fully lit by sunlight.
¶ Generating The Terrain Normal Texture Correctly
Red (R): Normal Y-axis
Green (G): Normal Y-axis
Blue (B): Normal Y-axis
Alpha (A): Normal X-axis
The X-direction of the normal map, which is stored in the alpha channel, should look as if a light is shining on the map from the east (3 o’clock position). Conversely, the Y-direction, stored in the red, green and blue channel, should be set as if a light is shining on the map from the south (6 o’clock position). Incorrect normal directions will result in odd lighting in-game. The reason for the Y axis being in three channels is so we can use the same trick that we used for the Terrain Info Texture. Terrain normals should be saved as DDS with BC3 compression.
¶ Texture Resolution
As usual in computer graphics, these textures need to be rendered to a resolution with dimensions that are a power of two (e.g., 512x512, 1024x1024). The resolution should be at least of the same order of size as the heightmap’s resolution. Larger resolutions allow for increased detail at the cost of requiring more RAM to play, and increasing the file size of your map, which is limited by the FAF servers to 100MB after compression. Because of this limitation, it is important to keep the size of this texture in mind. For most use cases, a resolution of 2048x2048 or 4096x4096 for the map normals should be sufficient. For the terrain info texture a resolution of 1024x1024 should be enough.
Save the textures without mipmaps to save disk space.