Adjacency Bonus provides consumption discounts or production increases to structures positioned next to each other. The nature of the bonus depends on both of the structures and whilst not essential to victory, adjacency bonuses are useful and have their merits when employed properly.
¶ General
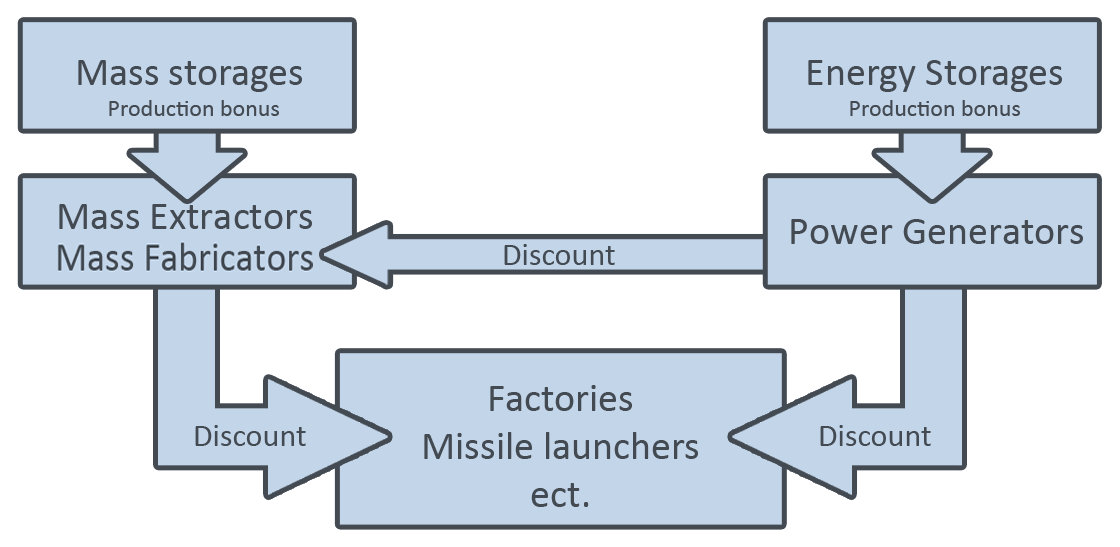
To trigger an adjacency bonus, there must be two structures placed next to each other; one giving the bonus and one receiving it.
- Any structure which produces a resource is a bonus giver.
- Any structure consuming a resource is a bonus receiver.
- Mass production structures are bonus receivers when placed beside Energy Production structures
- Mass/Energy Storage are bonus giver to their respective resource-producing structure.
- Doubling the number of bonus givers next to a bonus receiver doubles adjacency bonus.
Bonus amount is dependent on the number of bonus givers which can be place next to a bonus receiver.
- Minimum: 4
- maximum: 16
This means that the larger the size of a bonus receiver, the more bonus givers must be next to it to provide the same bonus.
Examples:
- A Factory surrounded by 16 T1 Power Generators receives the same discount as a Radar surrounded by 4 T1 Power Generators.
- A Mass Extractor surrounded by 4 Mass Storages receives the same bonus as a T3 Mass Fabricator surrounded by 12 Mass Storages.
¶ Consumption Bonus
A structure which produces a given resource gives a discount to all structures next to it which consume the same resource. It should be noted that only structures receive this bonus, not any Engineers or Engineering Stations assisting them.
¶  Mass
Mass
The values in this table are given for one mass-producing structure next to a 4x4 building; more mass-producing structures would increase the discount. The typical discount value is to give you an idea of what you would most commonly see in the game, and should not be used for calculations. Buildings which give mass discount bonuses
| Mass Producing Structure | Discount for one structure | Production Bonus for all Storages | Comments |
|---|---|---|---|
| 7.5% | 0.3-1 |
Useful next to T1 Land Factories, if you're not going to eco much. | |
| 10% | 1-2 |
Useful next to T2 Land Factories. | |
| 12.5% | 2-4 |
Useful next to T3 Land Factories Note: Quantum gateways only receive 10%. |
|
| 1.25% | 0.1-0.3 |
Not Very Useful. Note: If Both T2 and T3 Fabricators are turned off bonus doesn't apply. |
|
| 20% | 2-4 |
Useful next to T3 factories and high mass consuming structures (20/s or more). Note: Quantum gateways receive only 3.75%. Nukes receive only 12.5%. |
¶  Energy
The percentage discount value depends on how much of the structure in question is surrounded by Power Generators; as structures can be of different sizes, different numbers of Power Generators fit around them. This means that a factory that is 50% surrounded by 8 T1 Power Generators will receive the same bonus as a radar surrounded by 2 T1 Power Generators - 12.5% for both.
In this table, the discount percentages are shown for a fully surrounded structure:
| Energy Producing Structures | Discount Percentage | Typical Discount value | Comments |
|---|---|---|---|
| 25% | 0.3-1 |
Useful next to Radars and Air Factories. Not as great next to Land Factories, but should still be used. |
|
| 12.5% | 1-2 |
% value for ONE Hydro shown. Generally useful next to T1/2 Air Factories. | |
| 50% | 2-4 |
Useful next to T2 Air Factories. | |
| 75% | 0.1-0.3 |
Very Useful next to T3 Air Factories. | |
| 0% | 0 |
Useless - better to shield it. |
Buildings which give Energy discount bonuses
It should be noted that Mass Extractors consume Energy per second. T1 Power Generators should only be used for adjacency bonus when the Mass Extractor is upgrading from T1 to T2 very early in the game, to reduce Energy consumption whilst upgrading.
¶ Production Bonus
Any structure which produces a resource when placed next to a Storage of same resource, will provide a bonus percentage of that resource. This is most commonly seen for Mass Extractors, that are surrounded by Storage to increase Mass income.
- Bonus is 12.5% per fully surrounded side with Storages.
- Maximum is 50% bonus income for a fully surrounded (at all sides) structure with Storage.
¶ Mass
| Mass Producing Structures |
Production Bonus for one storage | Production Bonus for all storages | Comments |
|---|---|---|---|
| +0.25 | +1 |
Not very useful. Also not obvious due to how the game rounds the displayed values, same for T2 fabricators |
|
| +0.75 |
+3 |
Useful | |
| +2.25 |
+9 |
Very Useful | |
| +0.125 | +0.5 |
Not Very Useful, unless the storages are next to an extractor |
|
| +0.48 |
+5.76 |
Not Very Useful, better to place near t3 Pgens, Same for T2 Mass Fabs |
Buildings which are affected by mass storage
¶ Energy
| Energy Producing Structures |
Production Bonus for one storage | Production Bonus for all storages | Comments |
|---|---|---|---|
| +2.5 |
+10 |
Almost useless due to the explosion when the Storage dies. |
|
| +4 |
+50 |
Almost useless due to the explosion when the Storage dies. | |
| +27.78 |
+250 |
Almost useless due to the explosion when the Storage dies. | |
| +78.125 |
+1250 |
Almost useless due to the explosion when the Storage dies. |
Buildings which are affected by Energy storage
Adjacency Bonus should be employed knowing the cost and benefit difference. Players with little experience tend to surround Hydrocarbon Power Plants with Energy Storage, to get 50% more Energy production. Whilst 50% more resource production is considerable, especially in later game, must keep in mind that the cost of 12 Energy Storages is 14400 Energy and 3000 Mass. Was the "investment" worth the benefit of, in this case, 50 Energy per second?
3000 Mass roughly covers the cost of a single T3 Power Generator which produces 2500 Energy, compared to 1250 Energy when said Power Generator is surrounded by Energy Storages.
¶ Static Weapon Bonuses
Placing Power Generators next to Static Artillery will reduce the reload time of the weapon, and placing them next to Point Defenses or Static Artillery will reduce the energy consumption of the weapon.
¶ Rate Of Fire Bonus on Artillery Structures
When placed next to Power Generators, Static Artillery structures gain a rate of fire bonus which can be very significant, especially with T3 Artillery Installations which can achieve a 60% reload time with 4 T3 Power Generators, which are much cheaper than a second T3 Artillery installation.
The reduction of reload time can be calculated with the following schema if a unit is fully surrounded by the same Tech Level of Power Generator:
- 10% reduction for T1 Power Generators. (16% for T2 Artillery-sized structures).
- 25% reduction for T2 Power Generators/Hydrocarbon Power Plants.
- 40% reduction for T3 Power Generators.
The rate of fire bonus is less effective on the Aeon T4 Rapid-fire Artillery; it only has a maximum reload time reduction of 18% by placing a T1 and T3 Power Generator on each side. Each T1 power generator gives 0.5% reload time reduction, each T2 gives 2.5%, and each T3 gives 4.0%.
This table shows all possible time values:
| Artillery Unit |
T1 Power Generator | Hydrocarbon Power Plant | T2 Power Generator | T3 Power Generator |
Comments |
|---|---|---|---|---|---|
| 3.2s | 5s | 5s | 8s | T1 pgens useful, especially with multiple artillery structures. | |
| 1.3s | 3.3s | 3.3s | 5.3s | Very useful with T3 pgens, or any pgens. Note: T3 Artillery have varying reload times so the exact time reduction will vary. | |
| 0.3s | 0.3s | 0.3s | 0.5s | Very useful with T3 pgens, or any pgens. The size allows you to surround it with a T3 and T1 pgen for a 0.6s reduction. | |
| 0.8s | 2s | 2s | 3.2s | Very useful with T3 pgens, or any pgens. |
|
| 0s | 0s | 0s | 0s | The Ravager is a point defense, so it only benefits from energy consumption reduction (see below). |
¶ Energy Consumption Reduction
The rate of fire bonus reduces the time structures consume energy, but will also increase the frequency of energy consumption as a result of the increased fire rate. But in addition to that, power generators give a general discount on energy consumption to static artilleries. Making decisions around this behaviour is not recommended as the energy reduction is very low compared to the resources invested. This table is mostly to provide you with information on how it works.
| Energy Producing Structures |
Discount Percentage | Typical Discount value | Comments |
|---|---|---|---|
| 10% | 10-750 |
Useful next to all static artillery, especially T2, when safety is important | |
| 20% | 30-1500 |
Useful next to T2/T3 static artillery | |
| 20% | 30-1500 |
Useful next to T2/T3 static artillery | |
| 30% | 60-3000 |
Useful next to T3/T4 static artillery |