¶ Gaea tutorial: Producing terrain masks
The various map projects I've made have all been made possible by Quadspinner's Gaea, a terrain design application for VFX and games. Gaea is an industry standard and a great tool to significantly speed up creating or increasing the complexity of masks, heightmaps, and decals. Because of FAF's peculiarities and the fact that the game is more than a decade old, the process of producing masks using Gaea is a bit involved. Being the shiny beacon of enlightenment that I am, I will here share my workflow for making these masks.
¶ Prerequisites
This tutorial assumes you've got a basic understanding of image editing and FAF mapping. Additionally, it is suggested you familiarize yourself with the concept of visual node based programming. A very rudimentary understanding of Gaea is also required: while I will discuss the relevant nodes and how they work, I will leave familiarizing yourself with the software for self study. Watch a few youtube tutorials on the basics, or read the general introduction to Gaea here.
Required for this tutorial is a copy of Gaea (the indie version is free to use and more than sufficient for maps up to 20km), which can be downloaded here. Additionally, an image editor such as Photoshop or Gimp is required, though the free to use online photoshop-clone Photopea works fine too, as is the FAF map editor.
Footnotes marked as '[0]' where needed. Notes are added to the bottom of the tutorial.
When specific nodes are referenced, they are highlighted like this:
Node. Specific parameters for these nodes are written like this:Slope, 30, 90, 0, to specify aSlopenode with Parameters 30 (min), 90 (Max), and 0 (Falloff).
¶ Terrain, masks, and stratum layers
¶ A quick recap of the basics:
Once the terrain of the map has been created, usually the next step is applying textures. To apply the textures to specific spots, masks are drawn. At most, eight masks can be used per map. Masks are greyscale images, where the intensity of the pixel relates to the opacity of the texture. These masks can be imported and exported to and from the FAF editor.
The mask files usually have nearly the same resolution as the heightmap, with one small caveat: while heightmaps have resolutions of 2^n+1, masks have resolutions of 2n. Consequently, a square 10km map has a heightmap of 513 x 513px, but masks of 512x512px.[1]
¶ Furthermore, masks have several strict requirements:
- Masks are 8-bit RGB, non-interleaved .raw files
- Only greyvalues of 128 to 256 (50% white to 100% white) are used to assign textures. Values below 128 are ignored. (See figure 1)
- Due to a bug in the shader code, the normals of a layer are applied using the greyscale values of 0 to 256. Consequently, you may see the normals of a layer applied in sections where you do not see the albedo of a texture applied.[2]
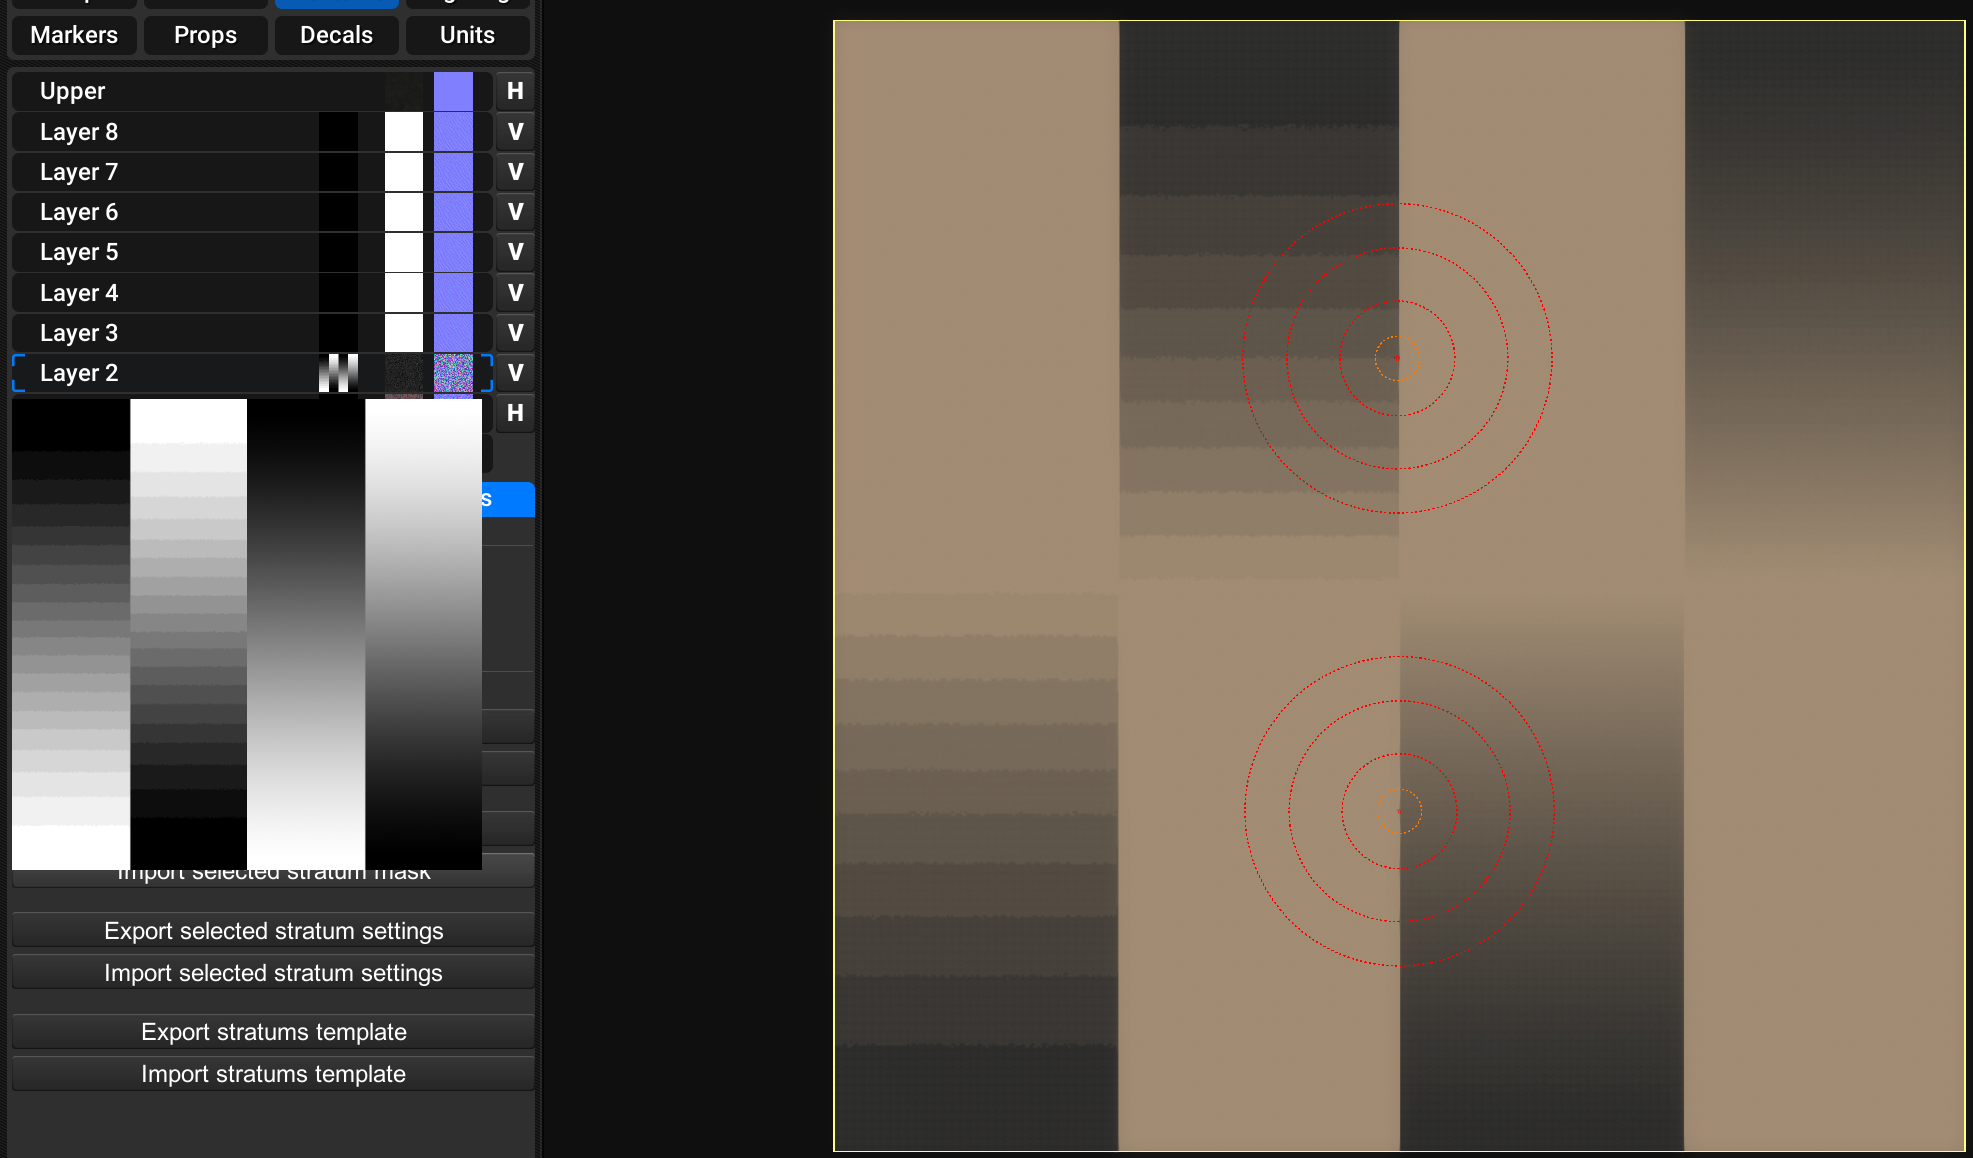
Figure 1: Showing how greyscale values below 128 (50% white, or grey) are ignored.
¶ The workflow summarized
In short, the workflow to create these masks is as follows:
- The terrain is created in or loaded into Gaea
- Several masks are defined using the various relevant nodes
- The masks are exported as .png8 files
- The greyscale value of the masks is adjusted
- The masks are exported as .raw files
- The masks are imported into the editor
For my map Project Dust, the masks when exported at step 3 (before the greyvalues are adjusted) look like this:
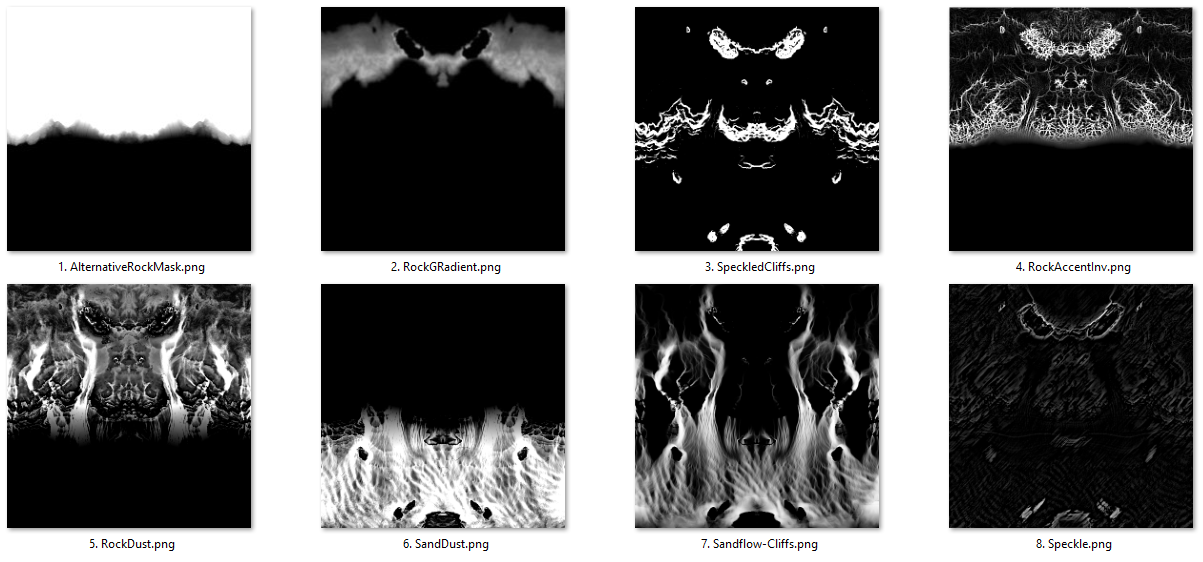
Figure 2: An overview of the exported masks for my map Project Dust. Notice how each masks highlights different features.
After adjusting the greyscale value, the final mask looks like this (example of mask #5):
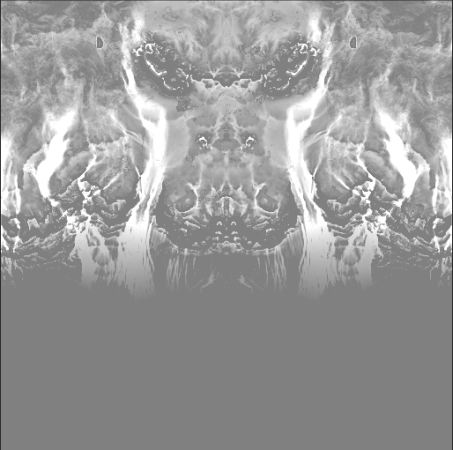
Figure 3: Grey-scale adjusted copy of mask 5.
¶ Loading the terrain in Gaea
To export terrain from a map made in the editor, open the map in the FAF editor and navigate to the Terrain tab. Under the Heightmap subtab, you will find a button labelled "Export heightmap". This will export the heightmap as a 16-bit RGB, non-interleaved, IBM-PC (34-12) .raw file.
This file can be loaded into Gaea using the File node. Add a File node to your workspace, and load in the exported heightmap. Due to differences in how Gaea and FAF interpret heightmaps, it may be required that you manually rescale the terrain vertically. The easiest way to do this is by using the Raise adjustments, which you can find by selecting the node and clicking the corresponding button at the bottom of the node's side-panel. Increasing the Multiplier value to scales the terrain up vertically. It is my understanding that for the subject of masking this scaling is optional, though I personally have found it easier to work at a scale as similar as possible to the FAF editor.
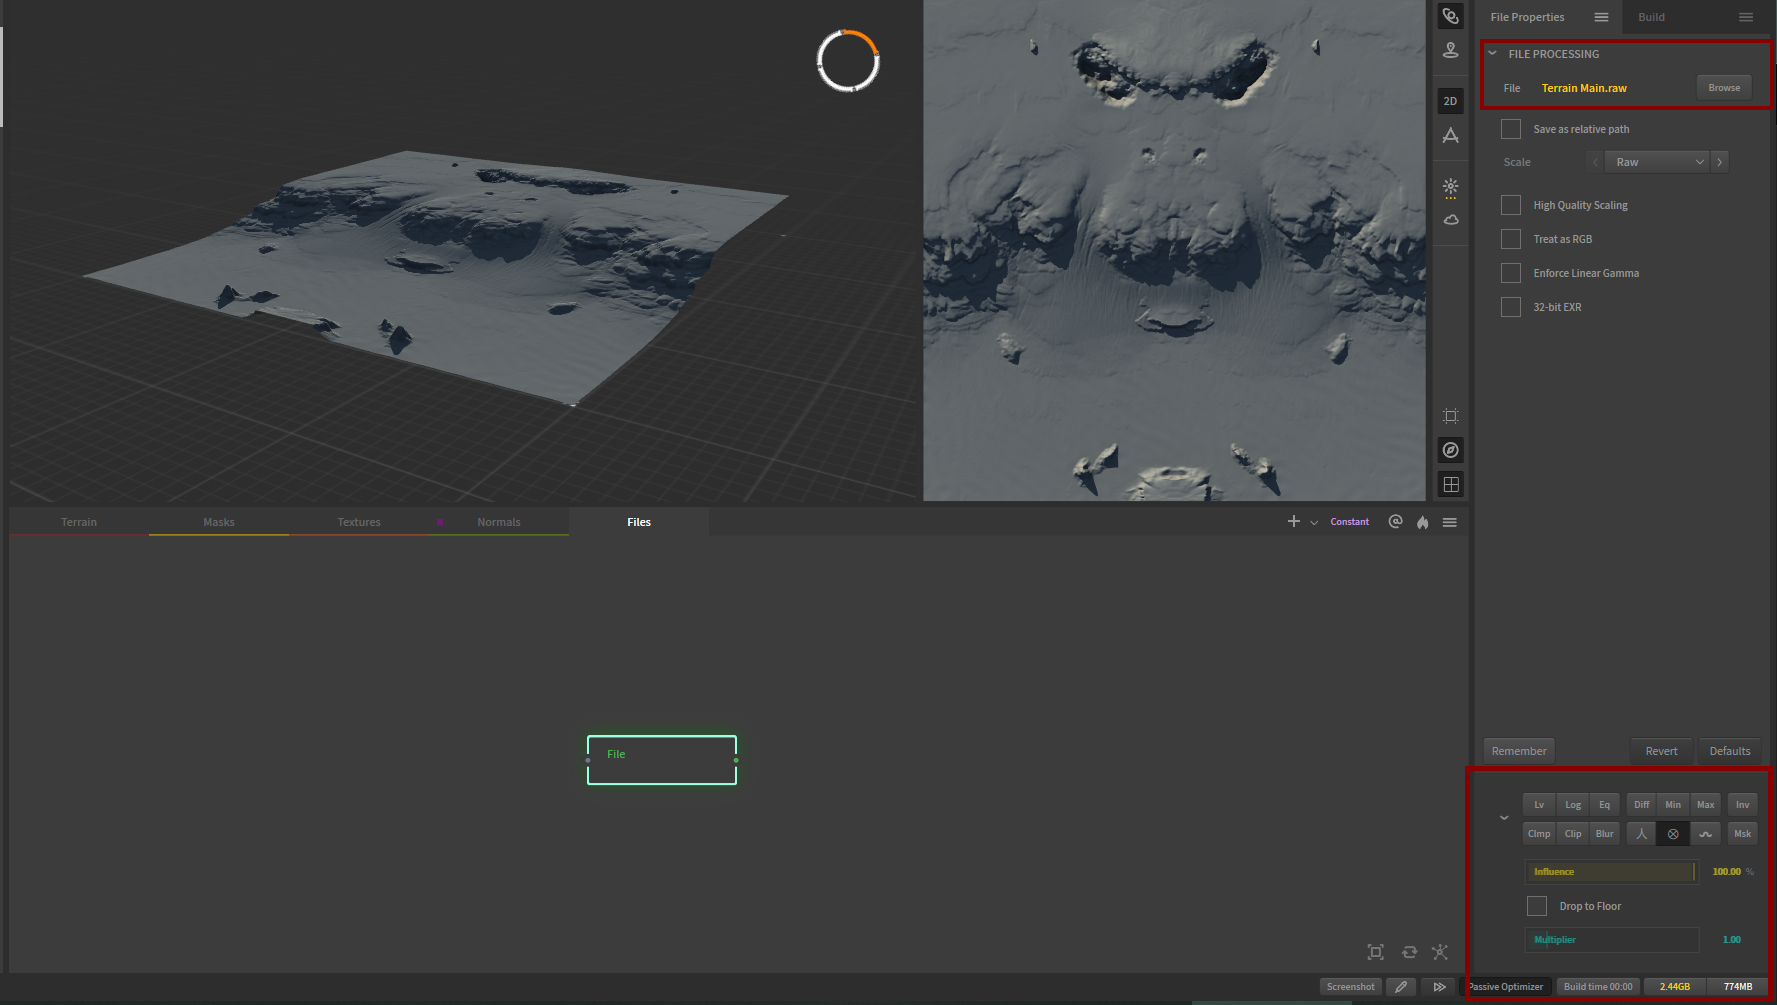
Figure 4: A file node is added, and the heightmap of Project Dust loaded. The Raise adjustment is selected, but in this instance the multiplier is set to 1.000, so the terrain is not scaled.
¶ Defining masks
As shown above in Figure 2, your aim should be to create distinct layers with specific textures in mind. The masks will allow you to distinguish specific features from the total terrain and to add extra detail to large areas that would otherwise be very homogenous. Using these masks, you can prototype a set of colours and textures within Gaea, and later use the masks for texturing your map. (Setting up this system within Gaea will be the topic of another tutorial).
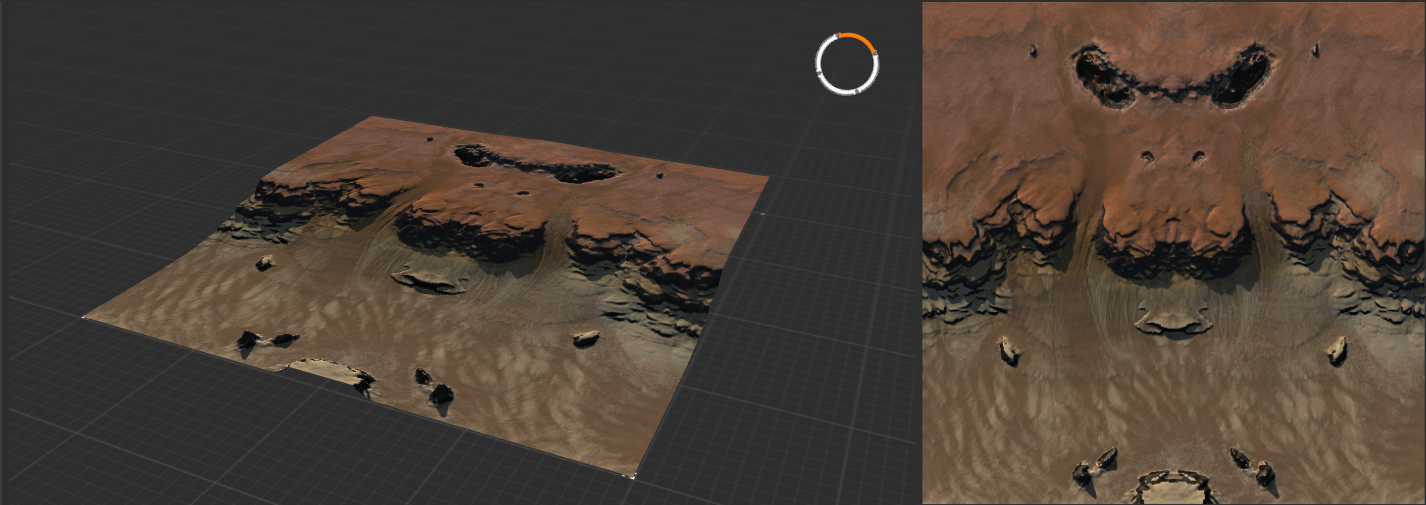
Figure 5: A mockup of the textures using the generated masks in Gaea
When designing a set of masks, I aim to have at least the following:
- One mask for each of the types of terrain
- A mask to distinguish the cliffs and unpathable terrain
- A mask for dirt, dust, and soil
- A mask for highlights
More masks may be added to add complexity to large sections of one type of terrain.
To create these masks, most commonly the nodes in the Data section are used. These nodes allow you to select certain parts of the heightmap, and include Height, Slope, Soil, Curvature, Flow, and Texture. Where necessary, the outputs of these are blended and combined using the Combine node.
To select all the cliffs on Project Dust, for example, I used the following setup:
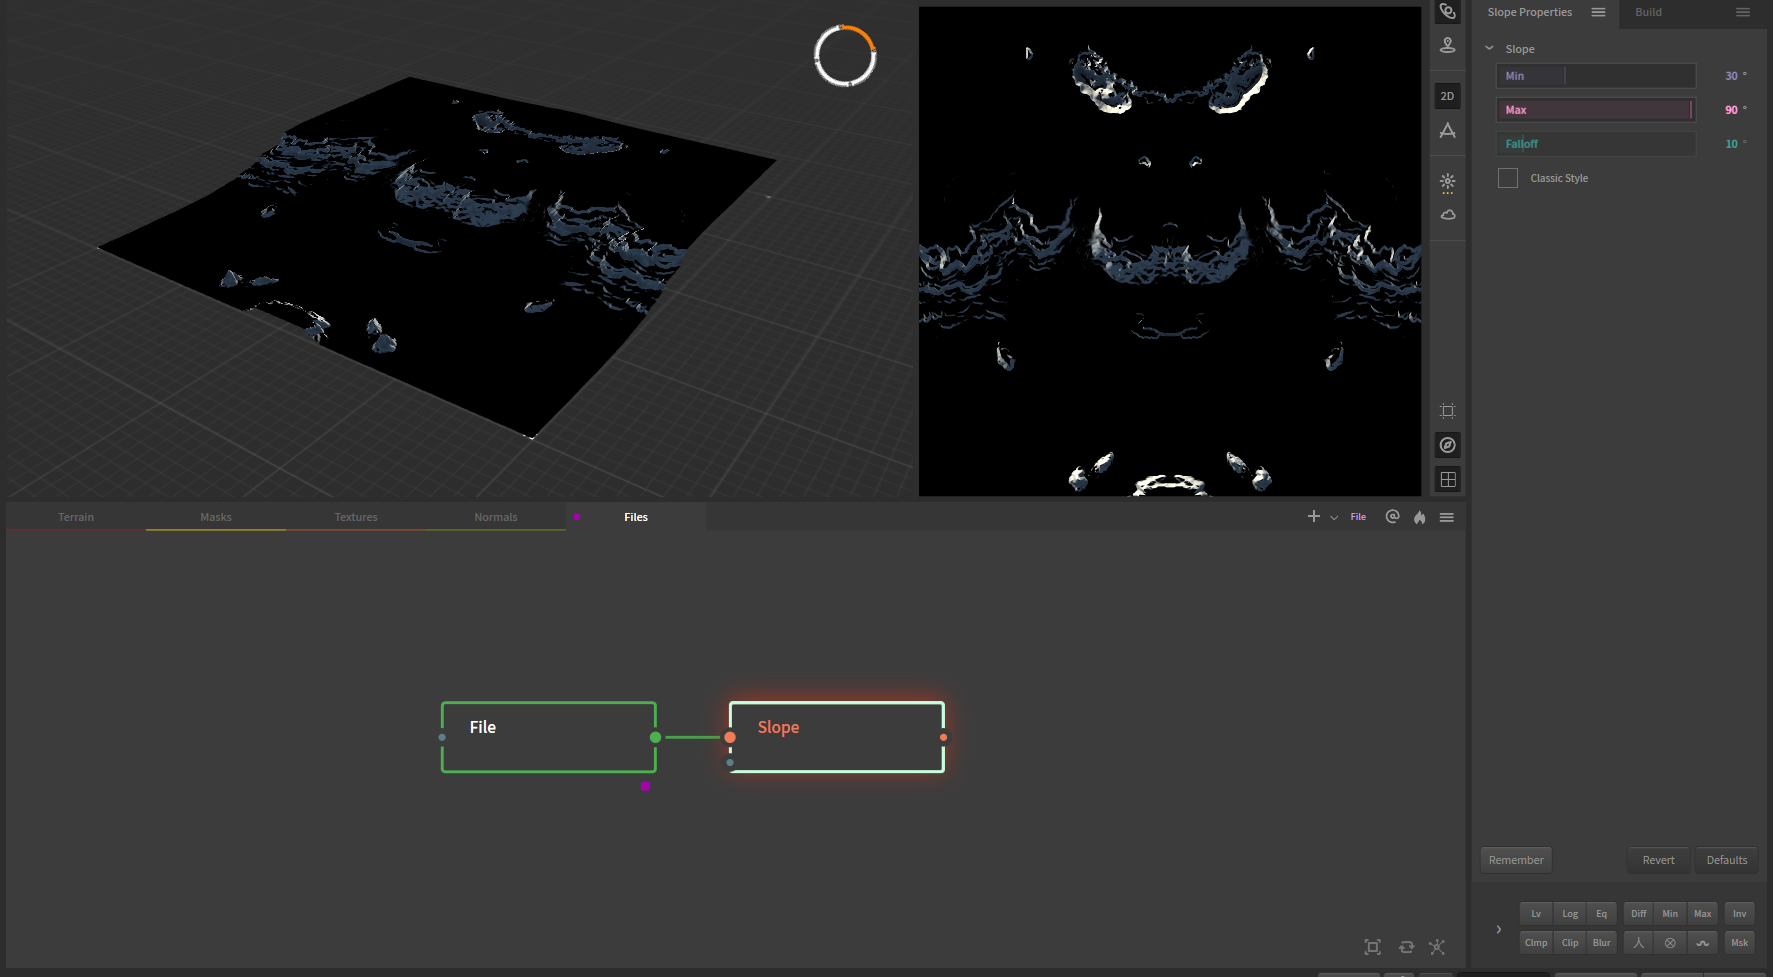
Figure 6: Setting up the cliff mask
First, I chained a Slope node to the File node. The Slope node has three main parameters: Min, Max, and Falloff. By adjusting the Min and Max values, you select all terrain that is sloped with an angle in degrees between those two values. The falloff value specifies the feathering of this selection; a falloff value of 0 results in a sharp delineation of the two selected and unselected regions, while the border gets progressively blurred as the value increased.
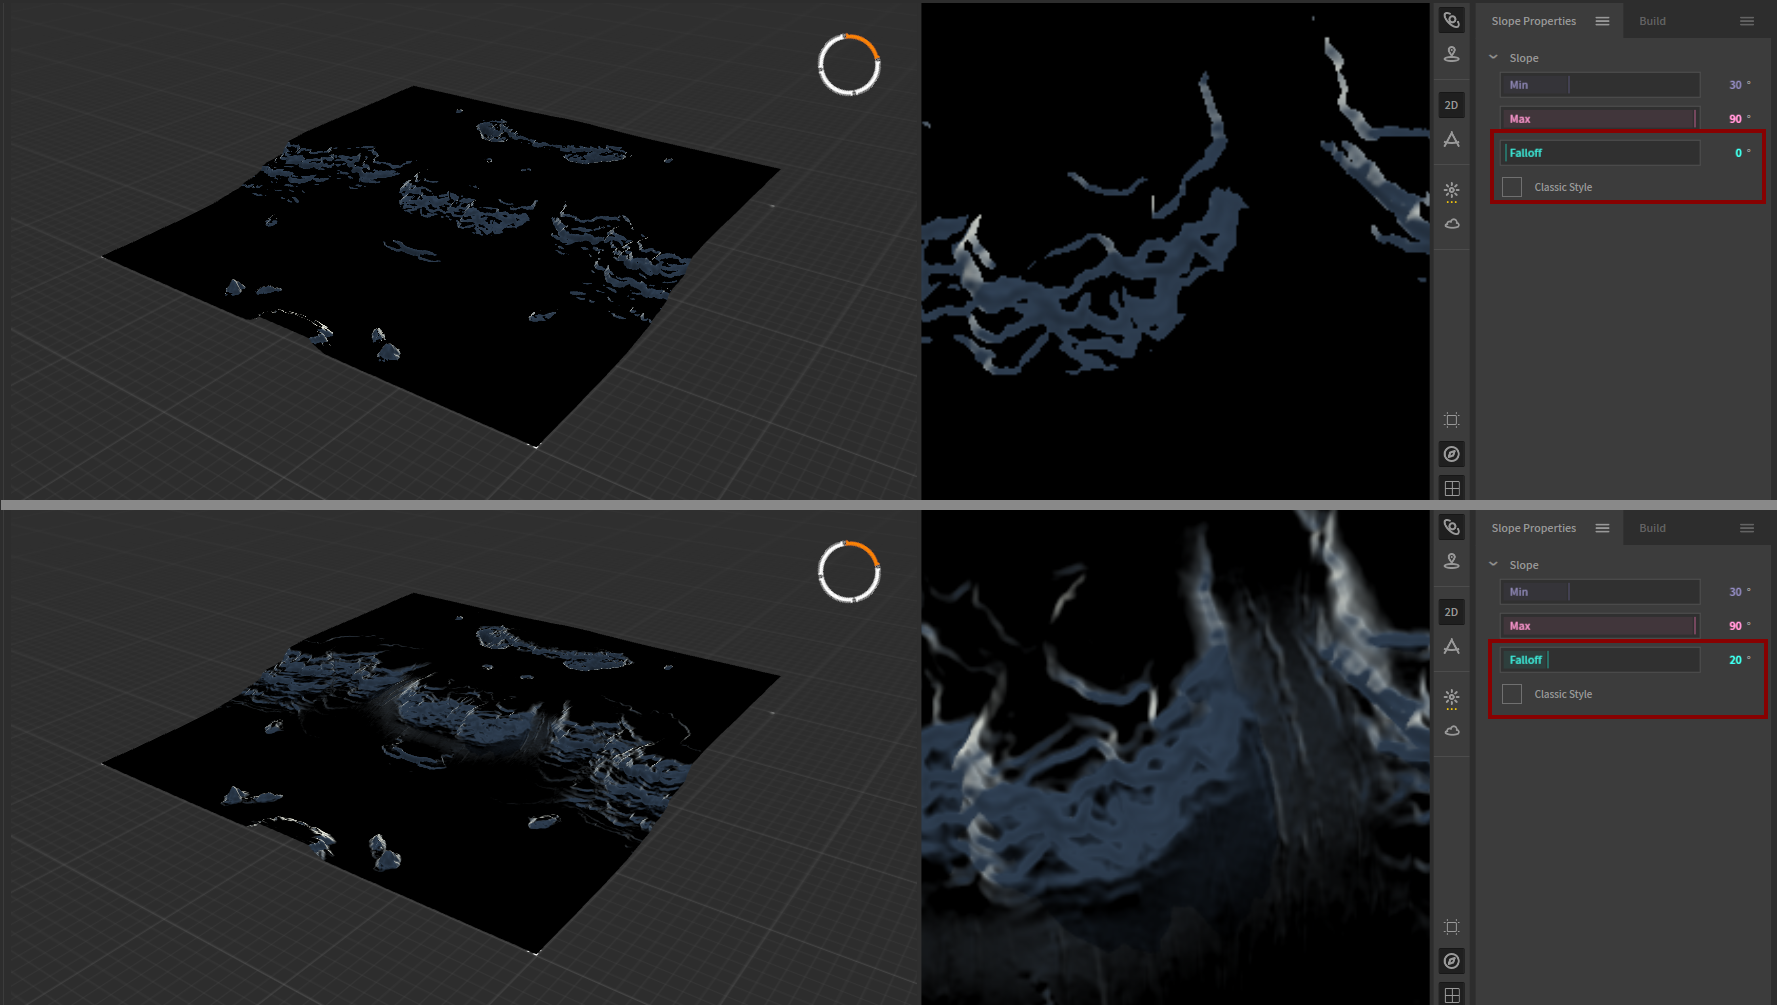
Figure 7: The effect of increasing the falloff value
Similarly, the Height node allows you to select terrain at certain relative heights.
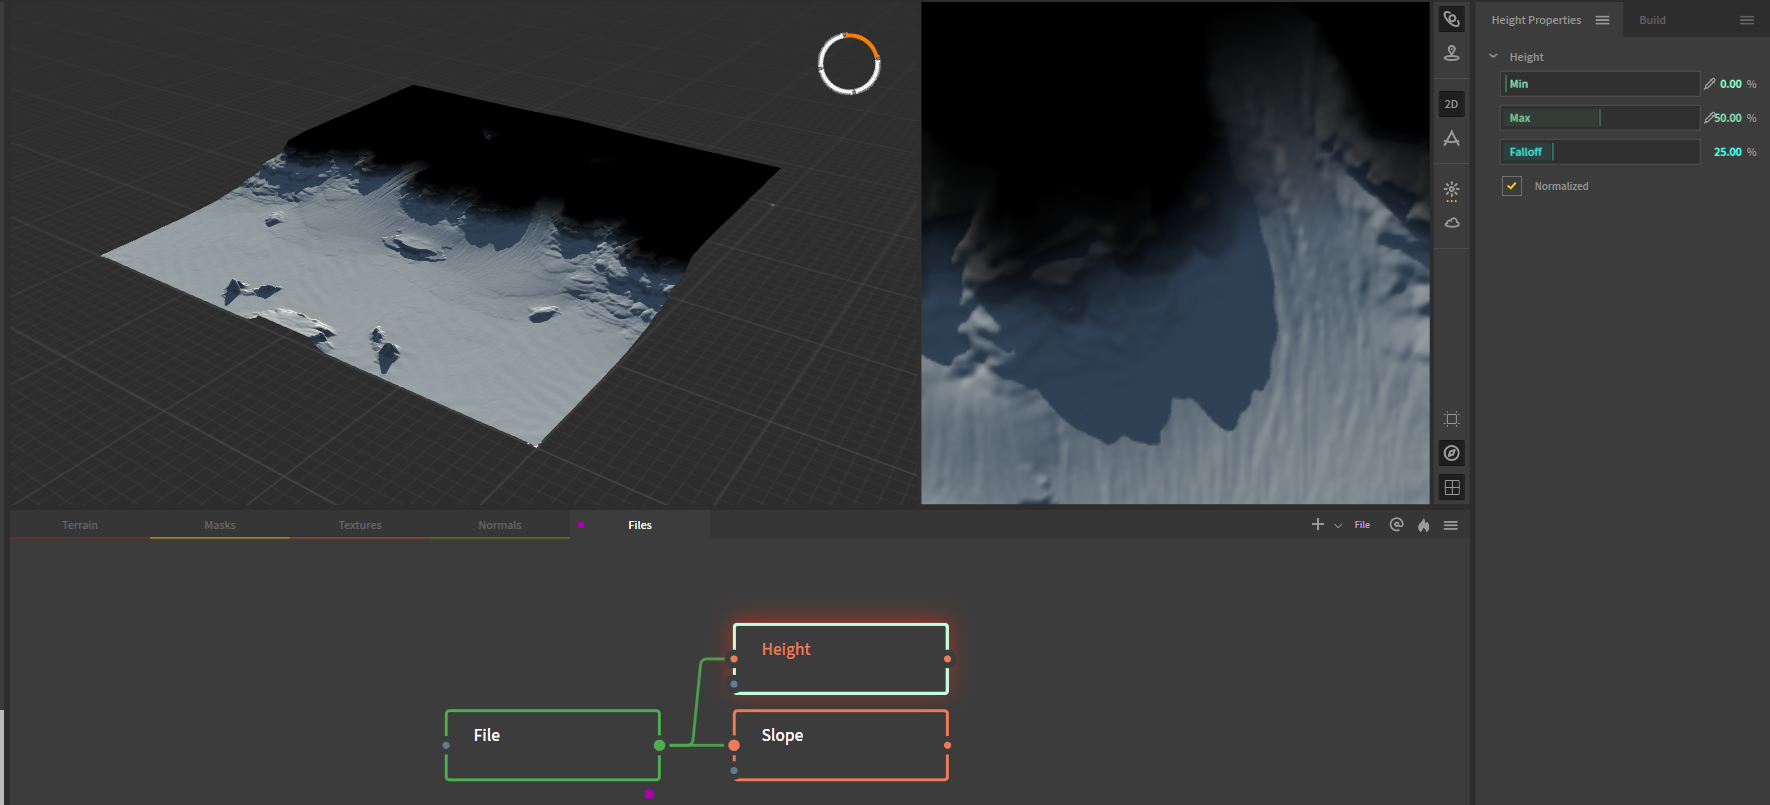
Figure 8: The bottom 50% of the terrain is selected, and the selection fades out over the next 25%.
These and others may be blended together to make selections of selections, or to add different selections together. If you want, for example, to only highlight all the slopes at the top of the terrain, you could select all the slopes (Slope: 30, 90, 0), selecting the bottom 50% of the terrain (Height, 0, 50, 10, Normalized), and subtracting the Height from the Slopes (Combine, Subtract, 100%).
Alternatively, you may select the top 50% of the terrain (Height, 60, 100, 10, Normalized) and chain this node as a mask into a slope node (Slope, 30, 90, 0).
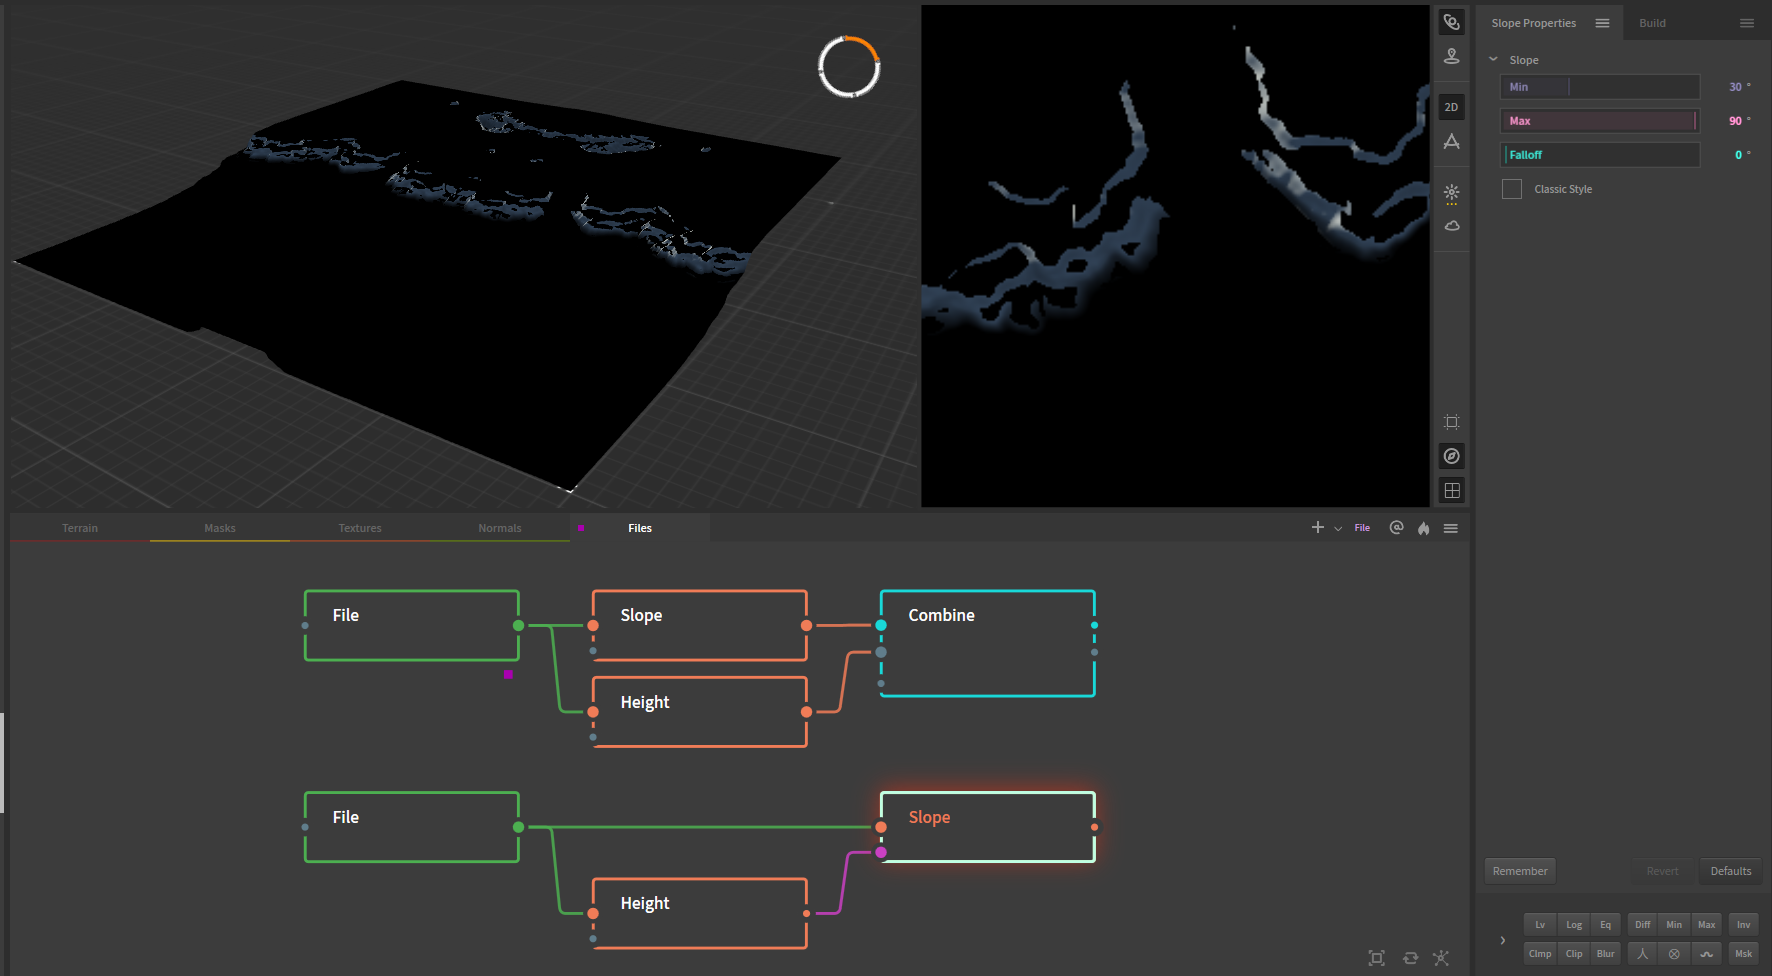
Figure 9: Two approaches to combining height and slope selection nodes to select only the slopes in the top 50% of the terrain.
The process of combining the various nodes will take some time and effort, and involves a lot of finetuning of values to get the masks exactly as you need them to. To keep all the masks organized, you may choose to rename the nodes corresponding to what terrain they select. For Project Dust, the final node tree to select all masks looked like this:
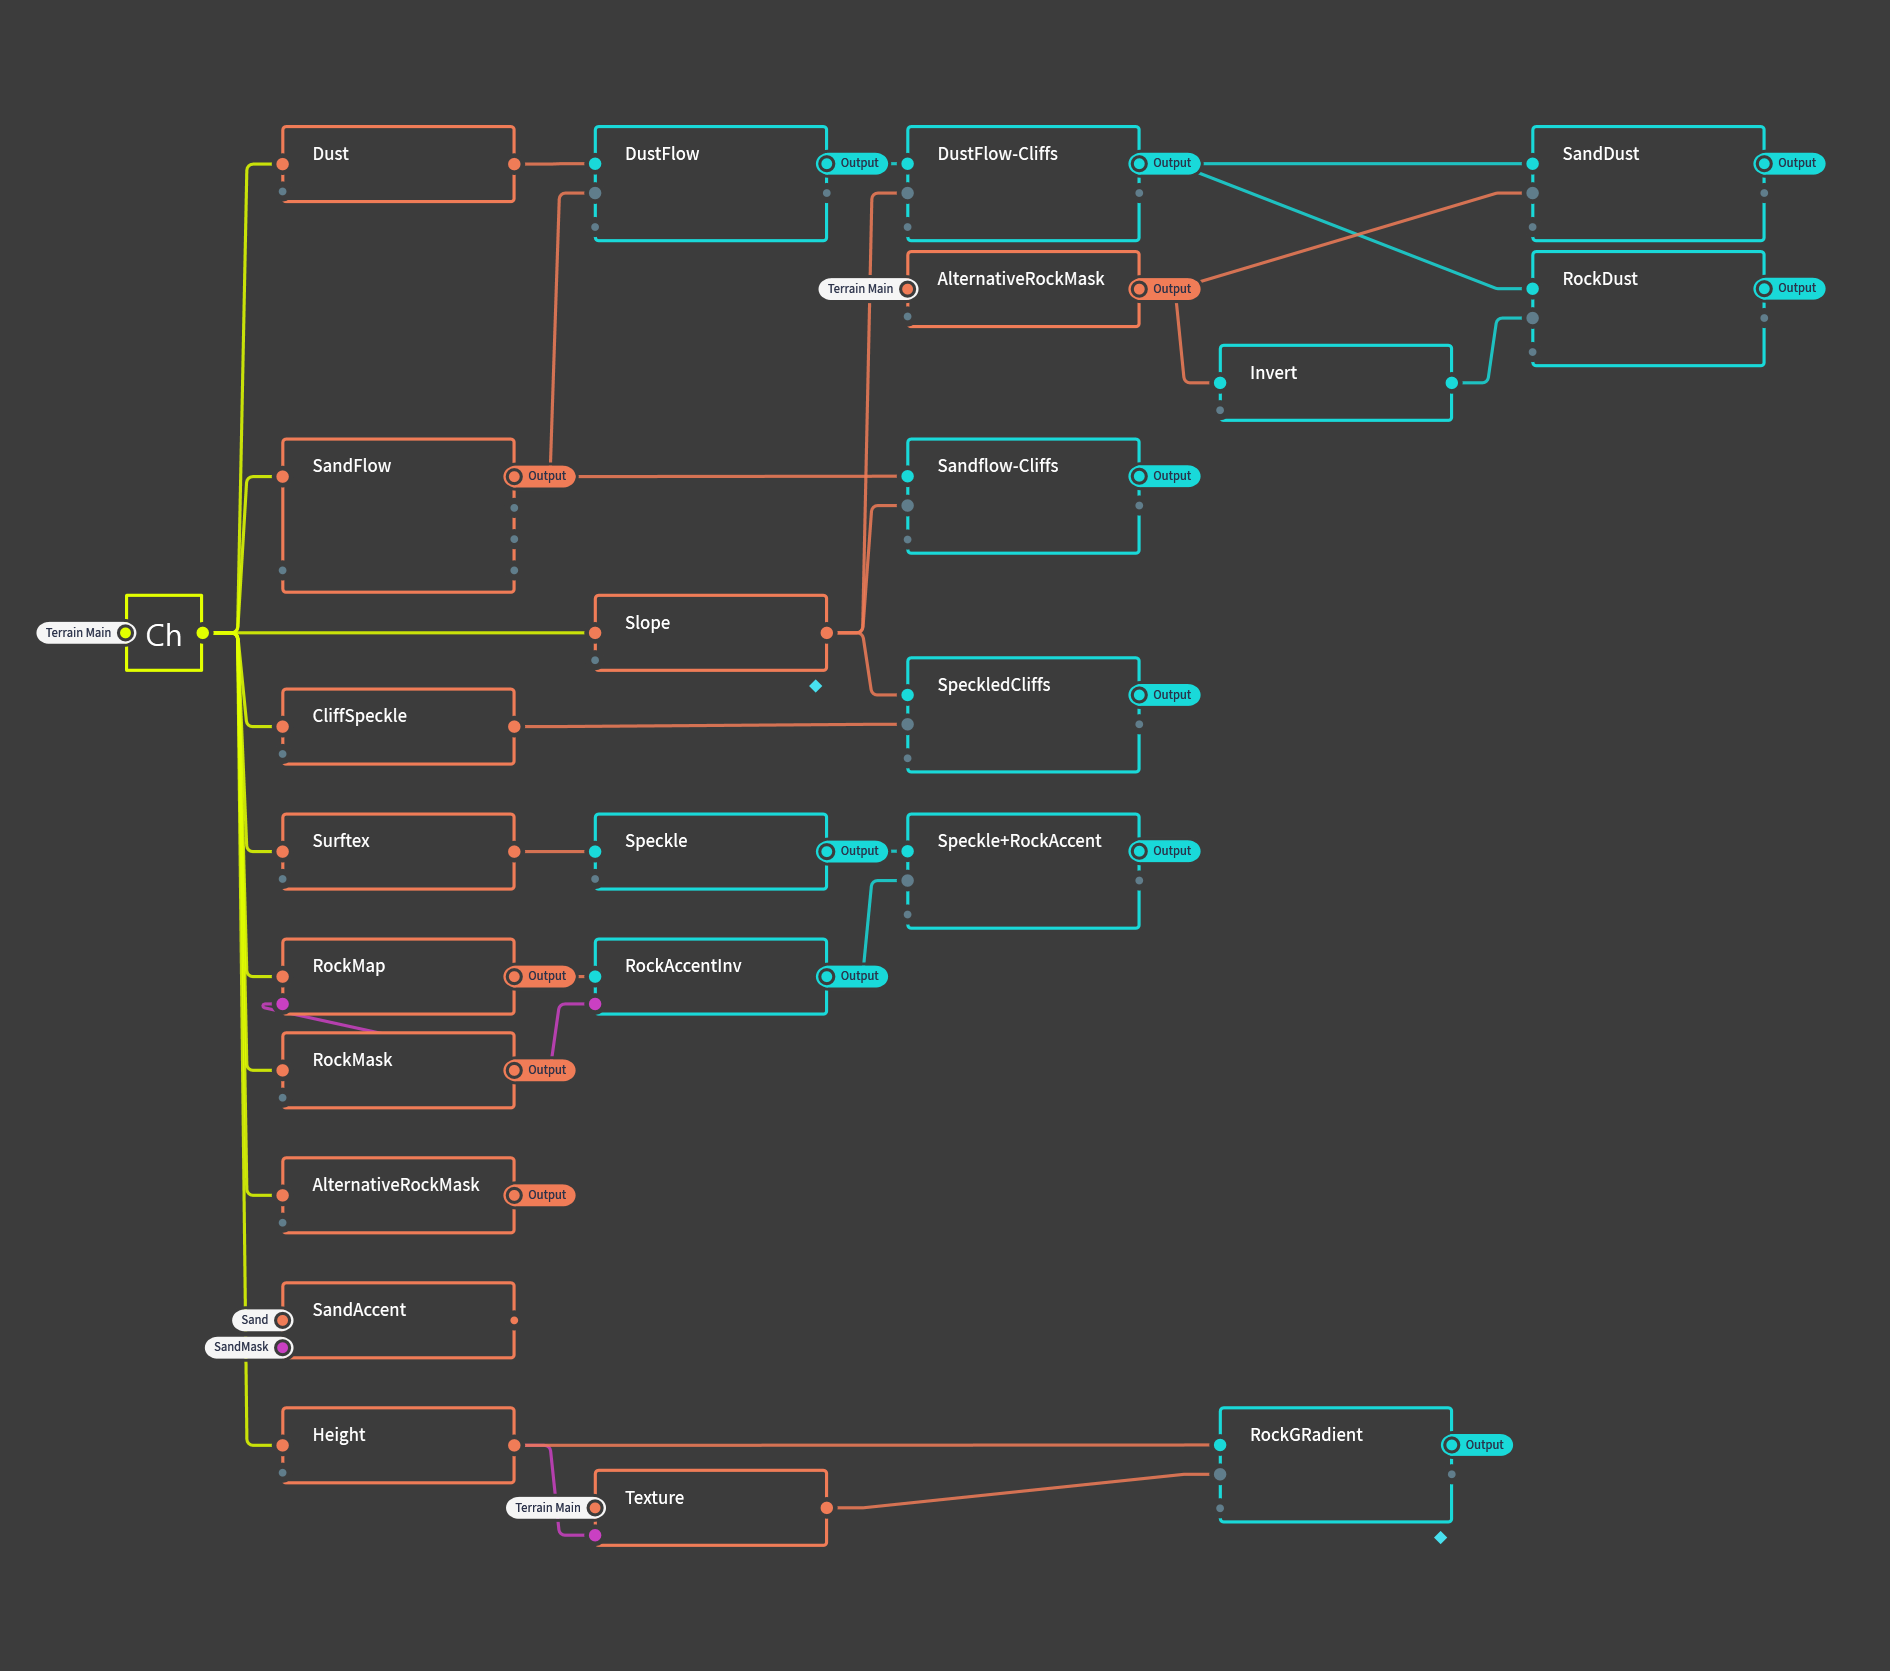
Figure 10: Overview of the node tree generating the masks for Project Dust
This somewhat complex graph might look a bit daunting at first, but it is important to realise that these structures are built one node at the time, logically following from and combining with the previous nodes.
For the curious reader: the little tags on some of the nodes are called portals, and allow for connection between nodes that do not share the same worksheet. For an introduction on portals, check the Gaea documentation.
¶ Exporting masks
To export the masks, select the relevant nodes and press F3, or right click and select Mark for export. The marked nodes will now show up under the Build tab in the top right. Adjust the relevant settings:
- Change the filetype of all masks to .png8
- Method should be left on Normal Build
- Resolution should be set to the size corresponding to your map's heightmap. (See note about resolution above)
- Colorspace should be left on sRGB
- Range should be left on Raw, although alternatively this may be set to
Remapped, 0.5, 1to skip the step of adjusting the greyscale values of masks.[3] - Baked Cache may be left on Use
After selecting where Gaea should dump the generated files, you can render the files by pressing Start Build.
¶ Adjusting masks
Two steps remain before the masks can be imported to the FAF editor. First, if the masks were exported with the Range setting left on Raw, the greyscale values have to be adjusted so that only values of 128 and up are used. Masks that were exported using the Remapped setting may skip this step.
Adjusting the greyscale values is as simple as adjusting the levels using your preferred image editing software.
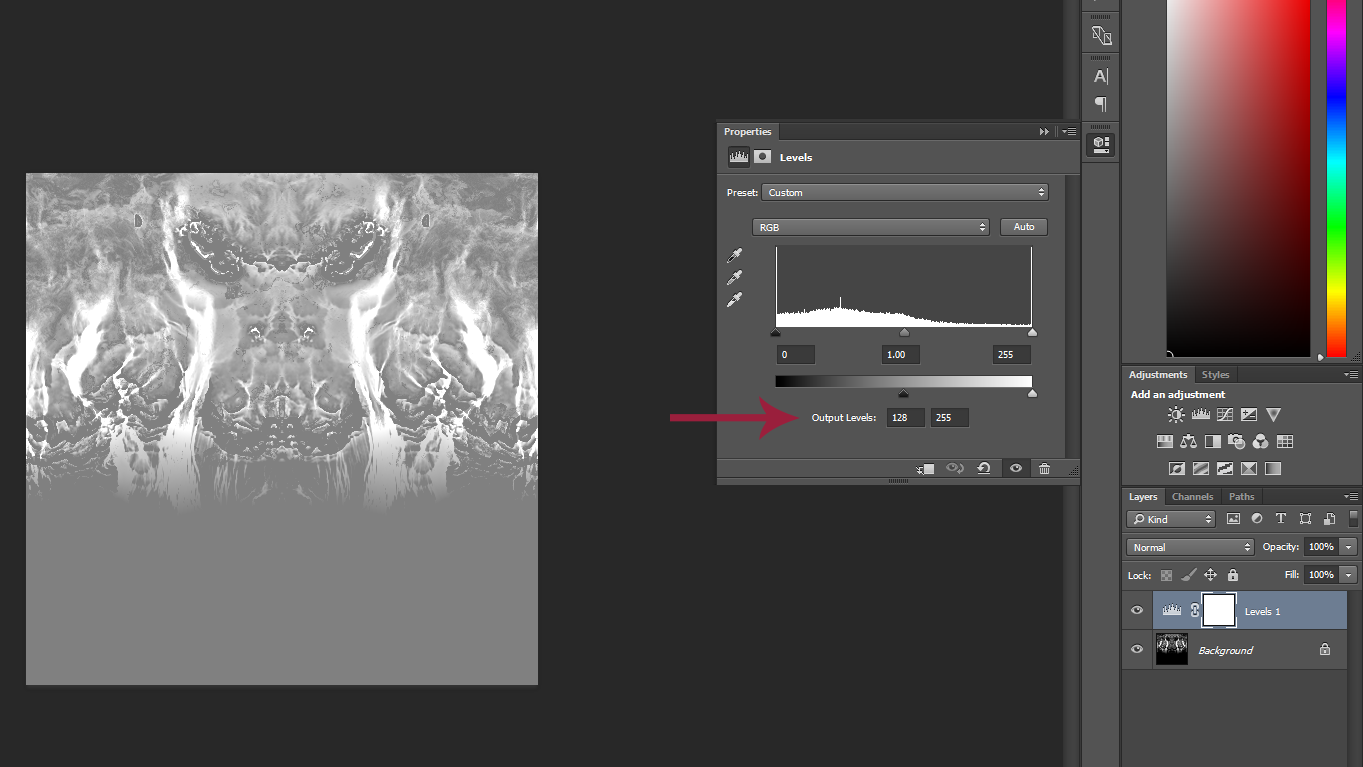
Figure 11: Adjusting the mask using the levels adjustment layer in photoshop
Similarly, encoding these files as .raw can be done in Photoshop or alternative image editing software. A great free and online alternative is Photopea, for those who do not own Photoshop.
To save the masks as .raw filetype, make sure of the following:
- The files are 8-bit RGB (should be fine as long as you export as .png8 in Gaea)
- The file is saved as .raw., 8-bit , 1-channel, non-interleaved, at IBM PC or 34-12 byte order.
- Double check that the resolution of your mask is correct
¶ Importing masks
Your masks are now ready to import into the FAF editor. Navigate to the textures tab, select a stratum, navigate to the Settings subtab, and click the Import selected stratum mask button. After loading the mask, the texture for that stratum should now appear where the mask exposes them.
¶ Common mistakes
"Hey", you say, "I see weird lines in my masks. What gives?"
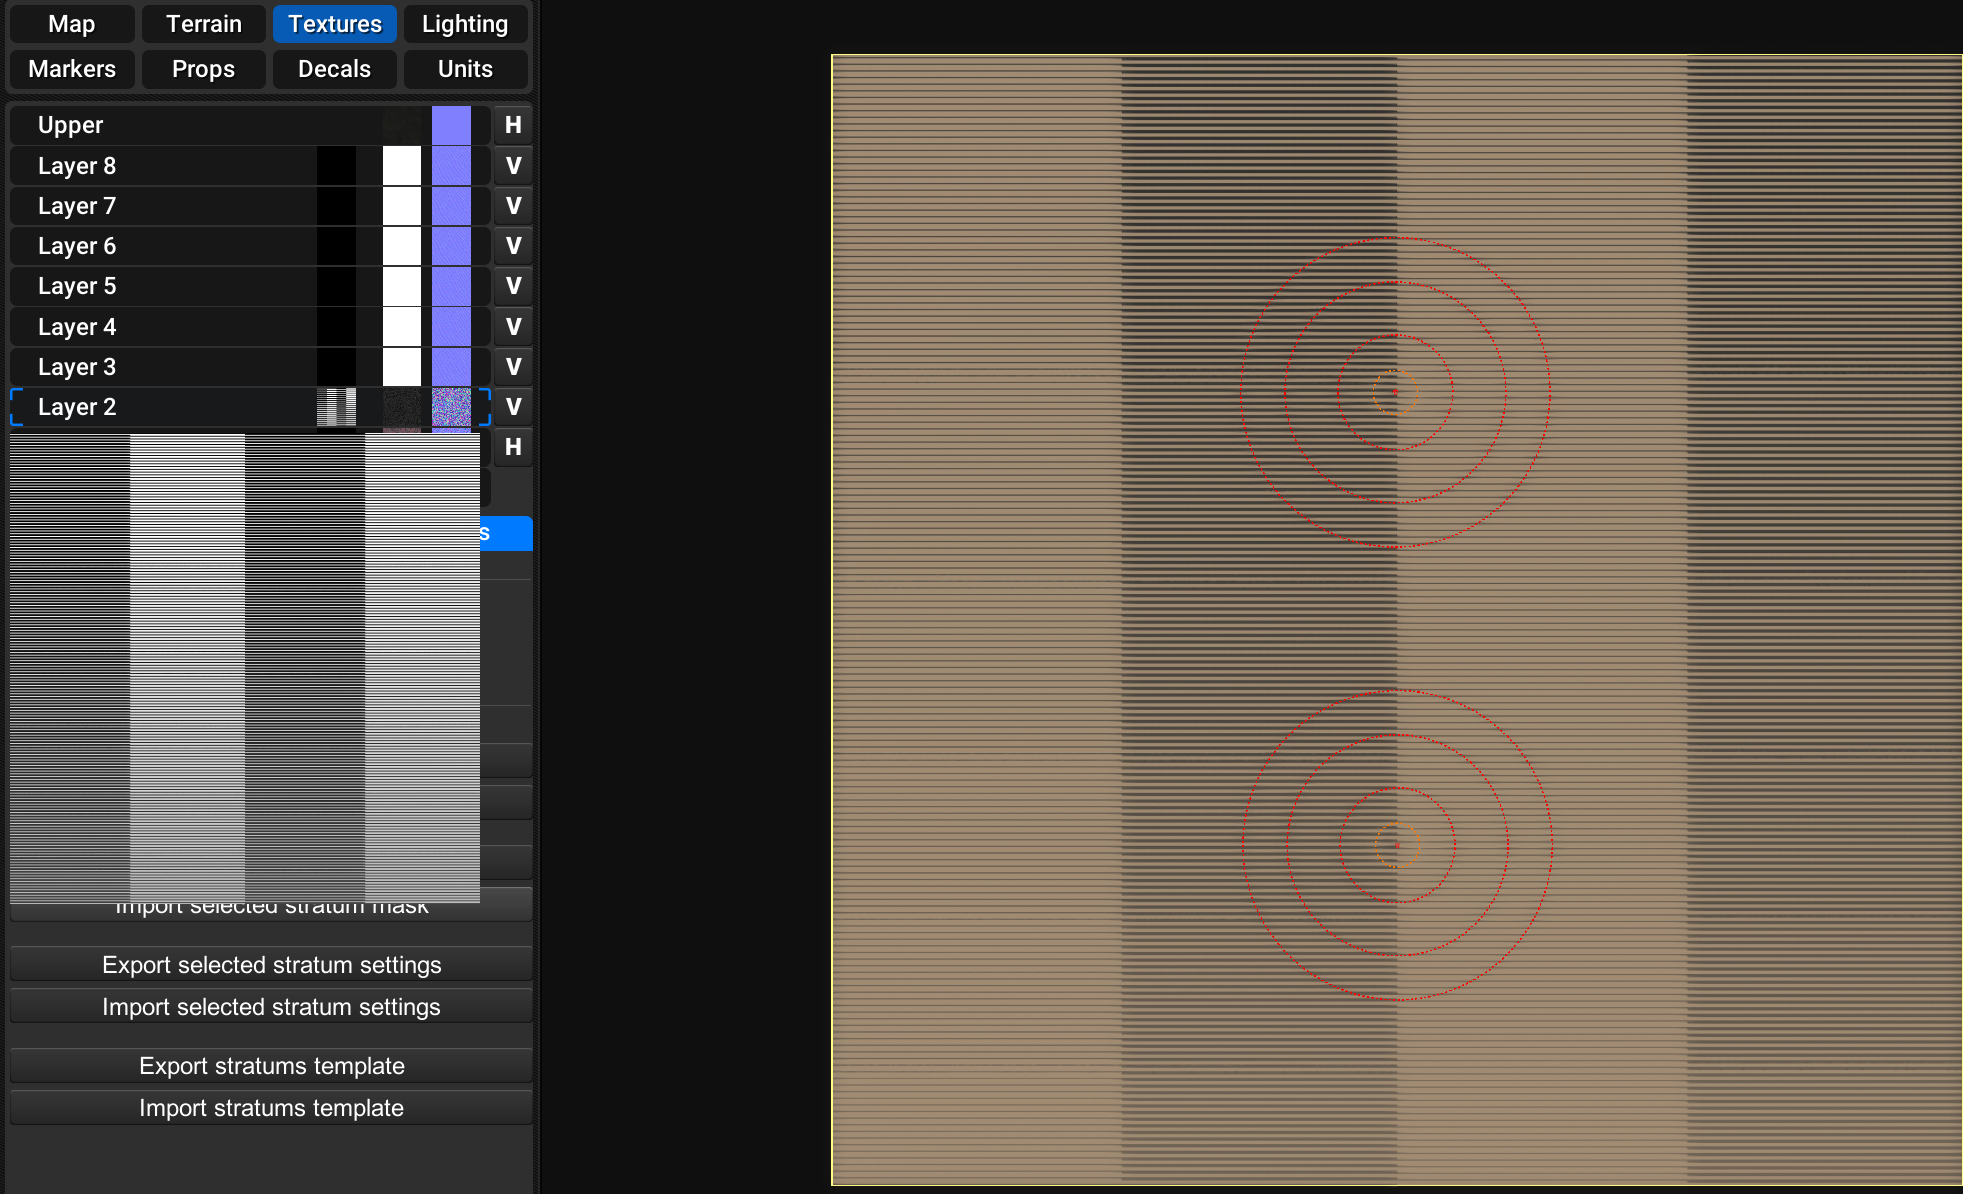
If you see something like the above, verify if you followed the instruction on the strict requirements above. Likely, you saved the .raw file as either an interleaved rather than a non-interleaved .raw or you exported the image as an 16-bit .raw.
A very common issue is a mismatch between the resolution of your mask and the resolution the map requires you to provide. This may be caused by [1] and should be debugged by creating a mask in the FAF editor, exporting the mask, and verifying the resolution in an image editor.
¶ Remaining questions
If you are left with questions or need help, your best bet is to check with people in the FAF discord Mapping-General channel. Alternatively, you may send me (IndexLibrorum, or Prohibitorum) a PM on discord, or leave a message on the forum.
¶ Footnotes
[1]: The GPG editor is known mess with these values. Any map that has touched the GPG editor at any point is suspect and the resolution of the masks should be verified by exporting the mask file and opening the image in an image editor.
[2]: There is a semi-functional workaround to prevent the normal maps from showing where they shouldn't. Finding this workaround has been left as an exercise to the reader.
[3]: If you are planning on using some of these masks in photoshop for manual adjustments or the like, it is best to export using raw range setting. This setting should also be used if you are attempting workarounds for the issue mentioned at [2]. The quickest and easiest method is to export as Remapped, though.