Welcome to 1v1 Ladder!
Whether you are a new player or simply wishing to improve, these are the guides for you. These guides are written by several trainers that are designed to provide a steady stream of information and improvement that you can read at your own pace, whilst also teaching the important concepts of self-improvement in 1v1 ladder.
You will notice that this is the first of the four 1v1 Guides we aim to provide to the FAF Community. Therefore, this section will only focus on the fundamentals of the game as these are the biggest hurdles within your skill range. Once you have mastered these fundamentals, you will shoot up the 1k+ skill rating, and you can move on to the next Guide.
¶ FAF Opening Build Orders
Even as a complete beginner, there’s one fundamental aspect of the game you’ll need to learn early on: the standard opening. It’s all about managing your resources efficiently and setting up a solid foundation for scaling. The good news? It’s the only part you truly need to memorize, and fortunately, it’s not too complex.
There are two main variants: one that includes the hydrocarbon power plant (commonly called “Hydro”) and one without. We’ll focus on the 3-land-factory version, since adapting from there is relatively straightforward.
Here is a legend of technical terms we will be utilising throughout this guide:
- ACU - Armoured Command Unit
- arty - T1 mobile artillery
- BP - Build Power
- E - Energy
- Engi - Engineer
- Hydro - Hydrocarbon Plant
- Inties - Interceptors
- Landfac - Land factory
- MAA - Mobile Anti Air
- Mexes - Mass Extractors
- Pgens / PG - Power Generators
- sub - Submarine
- T1/T2/T3 - Tech 1/Tech 2/Tech 3
Triple land opening with hydro:
ACU: Landfac → 4 Mex → Assists Hydro → Landfac → Pg → Landfac → Pg
Engis 1-2: Build Hydro, then expand
Engis 3+: Expand
Depending on the mex positions around your base, a small energy stall might happen but it's nothing you should worry about. After the initial build it's crucial to keep scaling your energy and production as you'll claim more and more mexes.
Triple Land (Without Hydro):
ACU: Landfac → 2 PG → 2 Mex → 1 PG → 2 Mex → 2 PG → Landfac → PG → Landfac
Engis: Expand
Same as the Triple Land Opening with Hydro you might experience a brief energy stall early on. Again, this is generally not a concern.
Once you're comfortable with both openings, adapting them becomes straightforward. Just keep two key principles in mind:
- Air factories require 3 PGs, land factories only need 1 PG.
- For each engineer assisting your ACU, add 1 extra PG before building your next factory.
For example, if you want to go second air, simply replace the 1 PG with 3 PGs and build an air factory instead of a land factory. If you're assisting your ACU with 2 engineers, queue up 2 extra PGs beforehand to avoid stalling.
Now to the question of "What should I even build in the landfactories?":
It is recommended to go for a standard queue until you get a feeling for the opening phase. The queue in your first factory looks something like this:
3 engis → tank → scout → engi → tank → scout → X engis
where "X engis" depends on the map. On larger maps with reclaim you can afford building more engis than on small maps without reclaim.
80% of all the landfactories you build afterwards want to queue something like
tank - scout - 5 tanks
and the other 20%
2 arty - 1 MAA
¶ Recommended Starter Faction
When starting a game, you can choose between 4 different factions, each with their own advantages and disadvantages. In general feel free to play whatever faction suits you the best, but be aware that especially Aeon comes with some downsides such as a very micro intense T1 stage (where you need to 'kite' with auroras, i.e. retreat them when in range of the enemy, and are punished more for not having land scouts with your army). While the faction choice won't be the reason you'll lose games, it can impact your improvement speed if you're picking Aeon.
¶ Spending Resources
One of the most important parts of FAF is spending your resources, and in 1v1 it's exemplified in its importance. In ladder it's very important you spend your resources effectively, and within your current rating bracket, that would be spending the resources within a semi-reasonable method.
Mass is the first of the three resources we will cover, Mass is utilised in the construction of both units and structures, and is the resource with a gimmick. Mass can be gathered by three means
- ACU
- Mexes
- Reclaim
What differentiates mass from energy is that you can only build mexes on mass deposits, which are spread out in varying quantities across different maps. This means that map control is something important to fight for so that you can build more mexes.
Energy is a required resource within FAF. This resource is required for both constructon of units and structues, and powers your mexes.
There are three main ways of acquiring energy, they are:
- ACU
- Pgens
- Reclaim (mainly trees)
Energy is also used for Overcharge, which is a high damage shot you can use to kill a group of t1 tanks, but it requires an E storage to unlock due to it's higher E cost to fire.
Build Power is one of the three essential resources of FAF. BP is required to spend both your Mass and Energy, and within there are three main sources of BP in FAF:
- Armored Command Unit
- Engineers
- Factories (Land, Air, Navy)
Each of these sources of BP will spend your Mass and Energy and produce units or structures, both of which you can use further to win games. Although it is wise to balance your BP, as having too little will leave you unable to spend your Mass and Energy, and having too much will leave you with wasted Mass and Energy in BP that you can't utilise effectively.
The FAF Economy balance is relatively simple in theory, but requires a lot of trial and error to adjust. For this rating, it would involve simply spending your resources, whether that be factories, pgens or units. Although, there are scenarios in which economic mistakes happen, even for the best players in the world, this guide aims for explaining the more prominent examples within 0-1000 rating, they are ordered in severeity, with 1 being worst case scenario, and 4 being least worst case scenario:
- Energy Stall
- Mass Overflow
- Mass Stall
- Energy Overflow
¶ Basic Strategy
Roughly 80% of maps in the 1v1 ladder are land focused in a typical pool. While a wide variety of strategies and tactics exist to give a player a decisive advantage in a 1v1 game, without understanding the fundamentals of the land spam strategy, a player will lose map control and likely lose before they can implement any of them. In fact, if executed properly, a t1 tank land spam strategy (where your focus is spending your mass on t1 tanks, and more t1 land factories to get more tanks if you dont have enough to spend all your mass) can outright win a player most games in the lower rating ranges, and even give them a decisive advantage in high rating ranges.
As you rise in the ladder, you will find more and more players embodying this strategy in their play. Luckily for you, there will be many inefficiencies in their execution. Ranking up from 0-1000+ thus only requires you to continually hone this strategy.
As a beginner, this is the size of map you will be given most commonly. Luckily for you, it is the simplest map type to implement our t1 land spam strategy.
- Begin with your basic opener (hydro or non-hydro)
- Set your initial factories build queue (see recommended build queues)
- Expanding aggressively to all mexes on your half of the map (if mass stalling, send more engineers or acu out to expand)
- Send the acu aggressively to the front lines after a few factories. Try to ‘farm’ as many enemy tanks as possible, but keep an army close by for safety (he is by far the most powerful unit on the map early in a game)
- Remember to set the build queue for each new land fac. Have and infinite loop of 5 tanks and one scout (later you can add some arty and MAA if needed)
- Remember to set the rally point for each land fac. Spread them out slightly behind the halfway mark of the map
- Probe the enemy with your tanks and land scouts. Raid isolated mexes and try to take good tank trades (such as 2v1 or 5v3, etc.)
- Perpetually choke the enemy out of expansions by attacking with superior numbers
- Use mass lead to further scale land factories and tank production
- Snowball tank lead with superior map control and army size
- Eventually launch a decisive attack on enemy base or acu directly to win the game
As a beginner 10x10km+ maps are not the most common size, but you will see them more and more as you improve. These maps offer far more gameplay variety in the tactics you can employ successfully. Still however, our t1 land spam strategy should be at the core of how we approach these maps.
- Begin with your basic opener (hydro or non-hydro)
- Set your initial factories build queue (see recommended build queues)
- Balance:
- Expanding aggressively to all mexes on your half of the map (if mass stalling, send more engineers out to expand)
- Spending mass resources as quickly as possible into facs (mainly land) and the pgens to run them (if holding excess mass, hold back engineers in your base to spend it)
- Remember to set the build queue for each new land fac. Have an infinite loop of 5 tanks and one scout (later you can add some arty and MAA if needed)
- Remember to set the rally point for each fac. Spread them out slightly behind the half way mark of the map, preferably in front mex expansions
- Dont forget an air factory. Queue a scout, three inties, and an optional bomber on repeat. On ~10x10km maps, making air as your third factory is standard to shoot down pesky early bombers in time and start scouting for your tank army.
- Begin flooding the enemy's side of the map with your tank army. Raid spread out mex locations with a few tanks. Keep the bulk of your armies together to overwhelm major expansions hosting many mexes and potentially factories of your opponent. Small raids can be done blindly, but large tank movements should always be preceded with scouting to determine if a battle is winnable.
- Be aggressive with your tanks, but also be careful not to suicide them. Any expansions you conquer, build the mexes with your own engineers and then place attack-moves to get the reclaim
- Get multiple dispersed t1 radar, and eventually a central t2 radar as soon as you can to view enemy tank counts and movement
- Perpetually choke the enemy out of expansions by attacking with superior numbers
- Use mass lead to further scale land factories and tank production
- Snowball tank lead with superior map control and army size
- Eventually launch a decisive attack on enemy base or acu directly to win the game
Roughly 20% of maps in the 1v1 ladder are navy focused in a typical pool. These maps play differently than land and thus require a new strategy. Navy maps can typically be identified by maps where you start on an island, or maps with 1-2 narrow land chokepoints coupled with water/ponds where T1-T2 navy built on your side can threaten a significant number of mexes on the enemy side.
- Begin with your basic opener (hydro or non-hydro)
- Set your initial factories build queue to purely engineers if you are on a island (as is common)
- Build an air factory and extra pgens to run it
- Produce a couple interceptors, scouts and then a transport to drop engineers all around the map to claim mexes and reclaim
- Continue building inties and air scouts for the rest of the game to defend you territory from air attack. You can optionally add extra factories and/or engie assistance to fruther increase your air force
- Build a few t1 navy factories to produce mainly frigates and some submarines (3:1 ratio works well)
- Raid mexes of your opponent close to shore with frigates (they have limited range) and any underwater mexes with subs
- Upon growing your economy from the transported engies building mexes, and engies at home spamming t1 pgens, start a t2 navy HQ upgrade, with as many engies as you can spare assisting
- T2 destroyers and cruisers are your win condition on most navy maps, if you can deploy even just a few of these uncontested on the shore of your opponents base, the damage they will sustain will very often be crippling
- This is where the inties, frigates and subs you built earlier come in. Your opponent may try to counter your destroyer+cruiser push with swarms of frigates or t2 torpedo bombers or gunships
- If they send frigates, you must react to this by sending your own frigates and supporting with your destroyers in the rear
- If they send t2 air, you must rely on your own air force and cruisers to shoot them down
- If you are able to defend your destroyers and cruisers, your opponents infrustructure should be severely damaged, if not obliterated entirely
Based on these observations we can create unit queue:
-
No underwater Mexes:
3-5 Frigates : 1 Sub -
With underwater Mexes
1-3 Frigates : 1 Sub
¶ Basic ACU Movement
Your Armored Command Unit (ACU) is one of the strongest offensive tools available to you in the game. Although there are some statline differences between the ACUs of different factions, this is not important for you when starting out. Instead, understand that without factoring in upgrades, Overcharge usage, or veterancy: An ACU has approximately the HP of 40 T1 tanks and the DPS of 4 T1 tanks. This is why it is important to learn how to use your ACU offensively in the frontlines instead of relegating it to a mere engineer in your home base. Otherwise, you are at a severe disadvantage in 1v1s if your opponent knows how to use their ACU as a weapon and you don’t.
At a basic level, your ACU should move out of spawn when your initial storage of mass is depleted and before you start stalling mass. The exact timing in which this occurs can be different depending on the availability of nearby reclaim and the number of mexes within the ACU’s build range. So keep an eye on your mass bar so that you don’t move the ACU too early or too late. Once your ACU starts moving out, your T1 engineers at home can take over the responsibility of building factories and power generators.
Where your ACU moves is going to depend on the map. Generally speaking, you want to move your ACU to contested points of interest (POIs) on the map. These locations contain something worth fighting for and are usually somewhere near the imaginary line that bisects your half of map and the opponent’s half. Some examples of these POIs are:
- Concentrated clusters of mexes
- Reclaim piles
- Chokepoints
In the images below, the bisecting lines that were mentioned earlier are drawn in cyan and the potential places where you can send your ACU are highlighted in yellow:
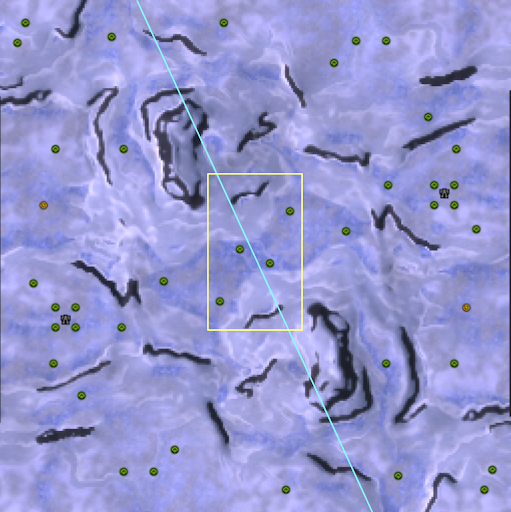
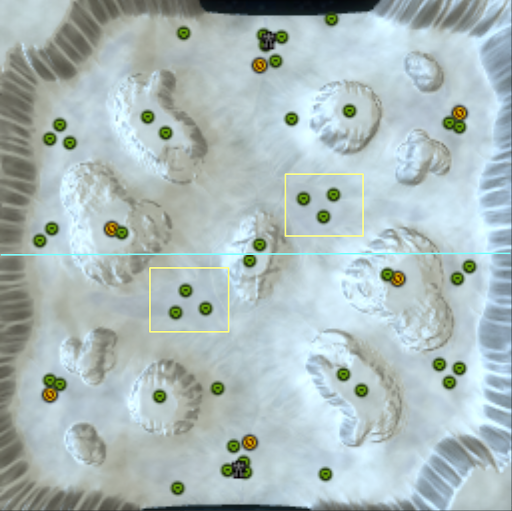

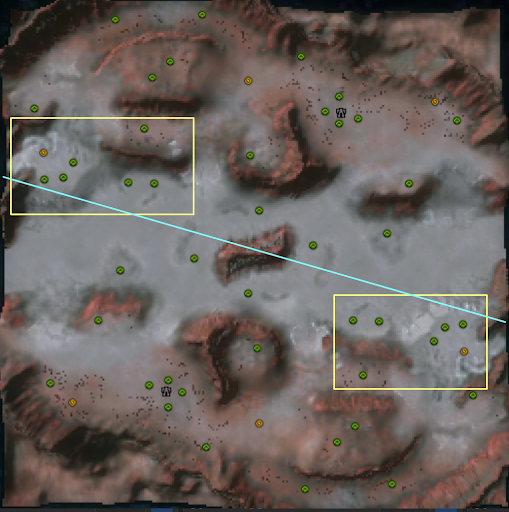
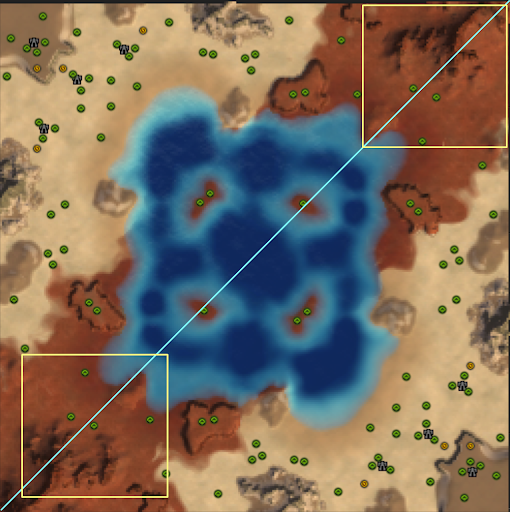
For the maps where there are two or more possible locations to send your ACU, you can usually take the safer approach and head towards the POI that is closer to your half of the map so that you can protect the position with your ACU. On the other hand, an early offensive move towards the enemy’s POI on their half of the map is usually too risky, especially if their ACU is already there with some of their own tanks. However, this can be an effective move if they are too slow to secure their own contested POI which is usually the case for lower rated 1v1 players.
During combat, have your ACU slightly in front of your units and not the other way around! As mentioned earlier, your ACU is a very tanky unit (10-12K HP depending on faction) compared to your T1 tanks (155-300 HP). Therefore, it is very important that your ACU absorb as much damage as possible without actually dying. Every shot that goes towards it is a shot that didn’t go towards your squishier army. Thus, your army will live longer and its effective DPS will be preserved.
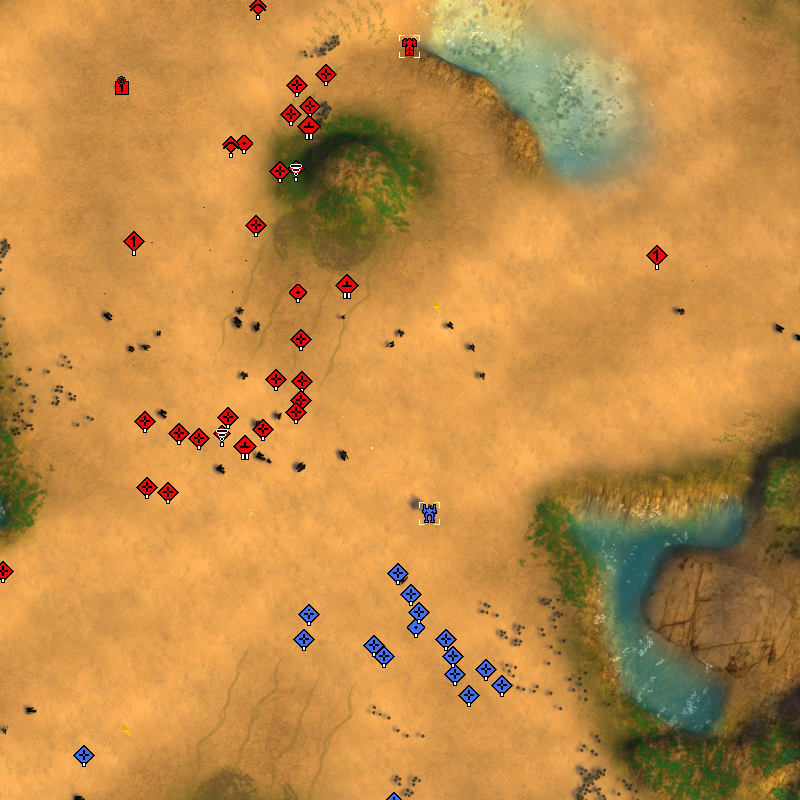
In the illustration below, Blue's ACU is positioned ahead of their units whereas Red's ACU is behind theirs. Red currently does not have enough units to overwhelm Blue's ACU so Red's units are getting farmed for free by Blue's ACU while Blue's army is unharmed, but ready to back up their ACU if Red commits to a hard push.
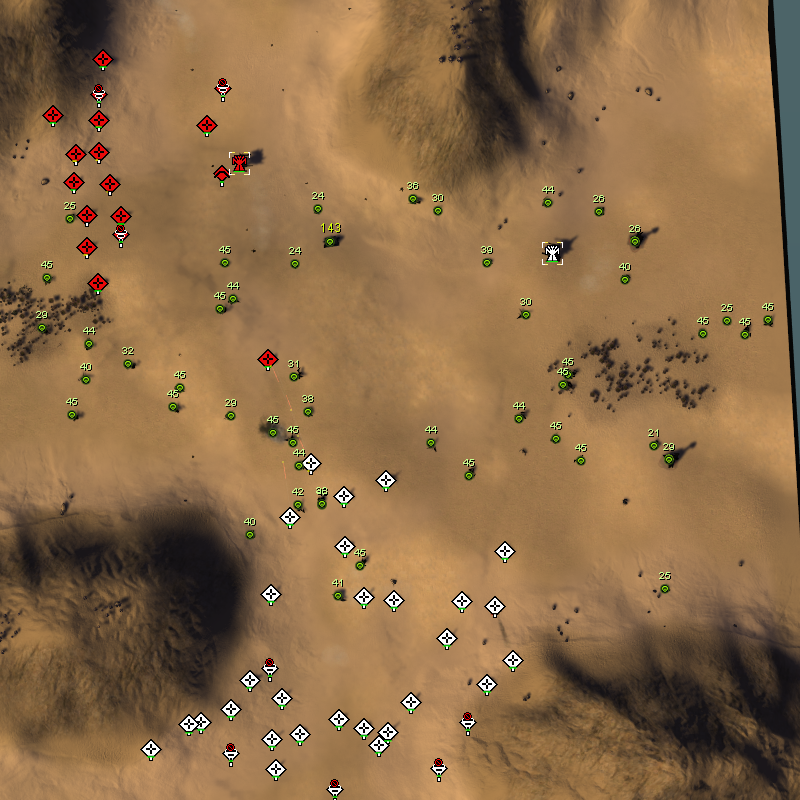
In this second illustration, both ACUs are posturing against each other with their army behind them. This is because they are attempting to secure the reclaim at this location while also taking pot shots at each other's army if given the chance.
This is obviously a potentially dangerous move as your ACU can be overwhelmed if there are too many opposing tanks. But understanding the limits of what your ACU can do at different stages of the game is a critical component for improving in the game. So do not be afraid to throw your ACU into danger if you think you can win the engagement. If you were correct, then you took a calculated risk and reaped the benefits. If you were wrong and lost the game, then you gained experience and should understand what went wrong so you can avoid making the same mistake in the future.