Welcome! This guide will take you step-by-step through the creation of maps for Forged Alliance Foverer, shown on a small 1v1 map entitled Summer Duel. Before you continue reading, please ensure you have all the necessary tools and everything set up: Map Editing Tools
If you’ve already taken a look at the Supreme Commander map editor, you’re probably a little confused. At first glance it doesn’t seem like there is a whole lot there. You’ve also probably noticed that there isn’t quite as much polish as Supreme Commander itself. This is because the tool was first built for internal use. Don’t let that get you down! This is the same editor that GPG uses at their studio. We are very lucky to have access to it. Everything you need to create rich maps like the ones that shipped with the game can be found in the editor, once you get used to it.
A word of caution: a good map takes many, many hours to complete. A lot more goes into maps than throwing up a heightmap and slapping down some textures. Doing those things is easy enough, but doing them in an interesting and gameplay promoting way is very difficult. If you have the patience, however, playing on a map you designed yourself can be a rewarding experience.
 Alternative tutorials for creating maps:
By blaxxun here, with using external programs for creating heightmap and texture masks.
By CookieNoob here, for creating adaptive maps.
¶ How the maps work
¶ Map Location
All maps downloaded from the Map Vault or created via FAF Map Editor are in this folder:
C:\Users\%UserName%\Documents\My Games\Gas Powered Games\Supreme Commander Forged Alliance\maps\
The original GPG Map Editor sees only maps inside vanilla Supreme Commander maps folder. If you want to edit already existing map via GPG Map Editor, copy it there.
C:\Program Files (x86)\THQ\Gas Powered Games\Supreme Commander\maps
- Sometimes the editor can't do changes in Program Files folder and therefore saves your map in this folder. That can be fixed by launching editor as administrator.
C:\Users\UserName\AppData\Local\VirtualStore\Program Files (x86)\THQ\Gas Powered Games\Supreme Commander\maps
¶ Basic map files
Each map is in it's own folder. The map name is used for the folder name as well as for the other files. The folder name should not start with a number or include any special characters except "_" (and "." for the version, but that is added automatically by the server, when uploading the map) There are 4 files needed to have a working map.
The .lua files are just text files so any text editor can open them.
¶ .scmap
This file contains information about heightmap, textures, props, water, etc... It's always generated by the editor and you can't change it in any other way than via the map editor.
¶ _save.lua
Save file contains information about armies, placed units and markers. Even thought it can be edited manually, the editor is able to do everything on it's own, so you should not be needed to touch it.
¶ _scenario.lua
This is the first file that the game uses, it contains the basic information about the map and paths to the other files. Here is an example one:
version = 3
ScenarioInfo = {`    name = "Monaki",
    description = "Don't get lost in the hidden territories of Monaki, try to survive while you controll it. Dominate or be dominated, blood runs down. Map by speed2",
    preview = '',
    map_version = 1,
    type = 'skirmish',
    starts = true,
    size = {256, 256},
    map = '/maps/Monaki/Monaki.scmap',
    save = '/maps/Monaki/Monaki_save.lua',
    script = '/maps/Monaki/Monaki_script.lua',
    norushradius = 50,
    Configurations = {
        ['standard'] = {
            teams = {
                {
                    name = 'FFA',
                    armies = {'ARMY_1', 'ARMY_2'}
                },
            },
            customprops = {
                ['ExtraArmies'] = STRING( 'ARMY_9 NEUTRAL_CIVILIAN' ),
            },
        },
    },
}
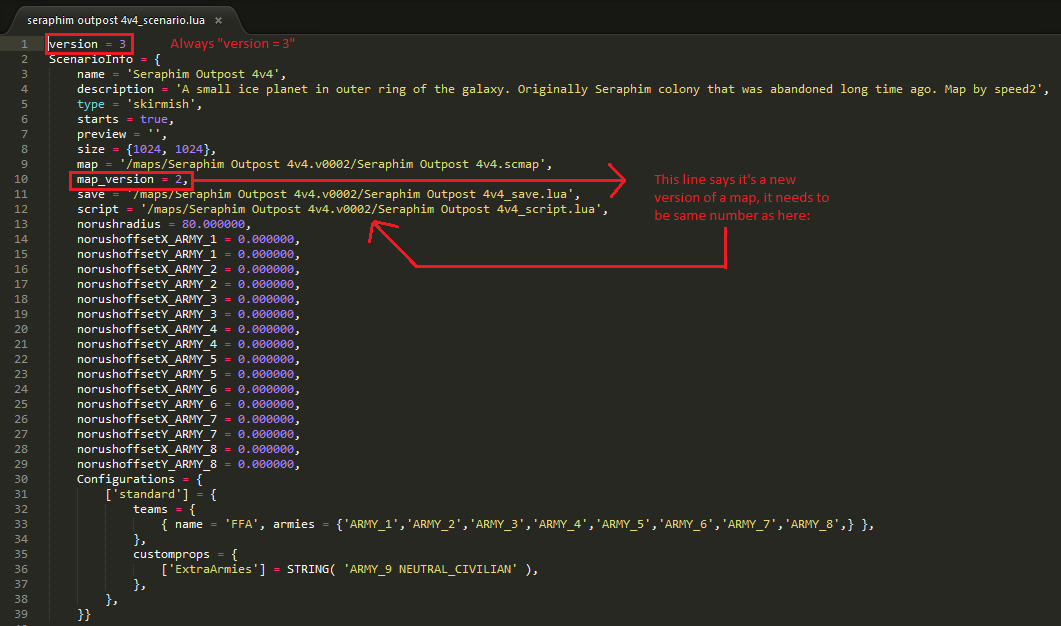
The first line that says version = 3 has to be always like that. This is NOT the map version. To change the version, you need to edit map_version value (if the editor didn't write this line, do it manually.)
¶ _script.lua
The last file needed is the map script. Which tells the game what should happen once it's loaded. This is an example file. If the editor didn't create it for you, you can do it manually. Just create a new text file and after pasting this code, rename the extention to .lua
local ScenarioUtils = import('/lua/sim/ScenarioUtilities.lua')

function OnPopulate(scenario)
    ScenarioUtils.InitializeArmies()
end

function OnStart(scenario)
end
It contains two functions, OnPopulate and OnStart. These are called by the game engine at the game start. The only thing that needs to happen in nonrmal skirmish match is to initiate the armies and spawn the ACUs. That can be done via function InitializeArmies which is inside file ScenarioUtilities.lua.
¶ Extra map files
These files are not needed for majority of the maps, they are usually used for survivals or missions.
¶ _options.lua
This file is usually used in survivals to contains extra options you can set in the game lobby. If you follow the format below, the lobby will load these extra options to the bottom of the Settings windows
TODO: Example
¶ Source of inspiration
You can open any map created by others and all original maps (SCMP). If you want to open Forged Alliance multiplayer maps (X1MP) or campaign maps (X1CA) you will need these edited versions.
¶ Original Maps
| Folder Name | Map Name | Folder Name | Map Name | Folder Name | Map Name | Folder Name | Map Name | Folder Name | Map Name | Folder Name | Map Name |
| SCMP_001 | Burial Mounds | SCMP_011 | The Great Void | SCMP_021 | Alpha 7 Quarantine | SCMP_031 | Four-Leaf Clover | X1MP_001 | Crag Dunes | X1MP_011 | Shuriken Island |
| SCMP_002 | Concord Lake | SCMP_012 | Theta Passage | SCMP_022 | Artic Refuge | SCMP_032 | The Wilderness | X1MP_002 | Williamson's Bridge | X1MP_012 | Debris |
| SCMP_003 | Drake's Ravine | SCMP_013 | Winter Duel | SCMP_023 | Varga Pass | - | - | X1MP_003 | Snoey Triangle | - | - |
| SCMP_004 | Emerald Crater | SCMP_014 | The Bermuda Locket | SCMP_024 | Crossfire Canal | SCMP_034 | High Noon | X1MP_004 | Haven Reef | X1MP_014 | Flooded Strip Mine |
| SCMP_005 | Gentleman's Reef | SCMP_015 | Fields of Isis | SCMP_025 | Saltrock Colony | SCMP_035 | Paradise | X1MP_005 | The Dark Heart | - | - |
| SCMP_006 | Ian's Cross | SCMP_016 | Canis River | SCMP_026 | Vya-3 Protectorate | SCMP_036 | Blasted Rock | X1MP_006 | Daroza's Sanctuary | - | - |
| SCMP_007 | Open Palms | SCMP_017 | Sytris Major | SCMP_027 | The Scar | SCMP_037 | Sludge | X1MP_007 | Strip Mine | X1MP_017 | Eye of the Storm |
| SCMP_008 | Seraphim Glaciers | SCMP_018 | Sentry Point | SCMP_028 | Hanna Oasis | SCMP_038 | Ambush Pass | X1MP_008 | Thawing Glacier | - | - |
| SCMP_009 | Setons Clutch | SCMP_019 | Finn's Revenge | SCMP_029 | Betrayal Ocean | SCMP_039 | Four-Corners | X1MP_009 | Liberiam Battles | - | - |
| SCMP_010 | Sung Island | SCMP_020 | Roanoke Abyss | SCMP_030 | Frostmill Ruins | SCMP_040 | The Ditch | X1MP_010 | Shards | - | - |
¶ Important to note before starting
The in-editor cursor is offset from your actual mouse pointer while the editor window is maximised. Make sure to run the editor in windowed mode in order to correct this issue. You can also choose to resize the window to suit your preferences.
- Size of the main window can be changed in this file:
C:\Users\%USERNAME%\AppData\Local\Gas Powered Games\SupremeCommander\Editor.prefs
- Edit height and width in Main to your values.
- If your editor start everytime maximized, change maximized value from truetofalse
   Windows = {
       Main = {
           y = 5,
           x = 10,
           height = 800,
           maximized = false,
           width = 600`
¶ Create a new map
Go ahead and start the map editor. You will be greeted by a familiar splash screen. The editor integrates directly with the game engine, and it puts it to some pretty cool uses. The splash screen will disappear to a black window once loading is complete. If the window starts out maximized, double click on the top blue bar to resize it down.
Under the File menu, select ![]() New. A dialog box will appear.
New. A dialog box will appear.
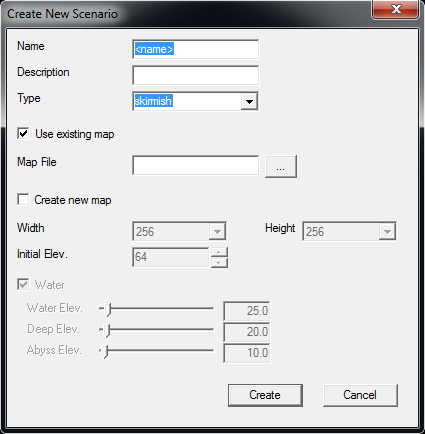
The options are mostly self-explanatory, but just to be clear:
| km | Game Units |
|---|---|
| 5x5 | 256x256 |
| 10x10 | 512x512 |
| 20x20 | 1024x1024 |
| 40x40 | 2048x2048 |
| 80x80 | 4096x4096 |
Map sizes:
- Name: The name of your map. The directory your map is saved to will be the same as this.
- Description: A short description of your map. This is the same description you see when browsing the maps before hosting a game.
- Both Name and Description can be changed later in Edit - Scenario... or in MAPNAME_scenario.lua file located in your map folder.
- Use existing map: You can create a new map based off of another map. For instance, if you wanted to modify Sentry Point to remove the civilians, you could fill in the Map File field with the path to Sentry Point. This is effectively the same as opening a map and saving it with a different name.
- Create new map: Starts a new, completely blank map. Selecting this will allow you to check and uncheck the Water field.
- Width/Height: Size of the map in game units. A 5x5 km map is 256x256 game units wide.
- You don't need to make square maps. Either select different Width/Height here, or later you can set playable area so map is cut.(Example Winter Duel)
- Initial Elev.: How high the default terrain is. A good number is usually 64. Very low or very high initial elevations may cause problems later on when you are editing your heightmap.
- Water: Enables or disables water. If you don't plan to have the water on your map, disable it, else it can cause some problems with zooming in the game.
- Water Elev./Deep Elev./Abyss Elev.: The threshold values for rendering water. If the heightmap is below these values, the appropriate type of water will be rendered. It is important to keep these in mind if you are designing a map with water. (These values can be changed later in Water Layer -
 Edit Water Properties)
Name your map whatever you would like. This guide will refer to it as Summer Duel, since we’re going to make a map similar to Winter Duel. You can leave the Description field blank if you’d like. Check the Create new map box. If you want to use water, keep the Water box checked; otherwise, uncheck it. Keep the map size at 256x256 and the initial elevation at 64. Click the Create button.
 A new map will be created and displayed. Click the save button on the toolbar or go to File > Save. Saving your work is never a bad thing. You should do it as often as possible. The map editor is stable, but there are certain elements beyond your control. The last thing you want is for your power to flicker and erase three hours of hard work! Take a moment and get accustomed to the feel of the editor. Zooming works the same as in Supreme Commander. You can scroll with Middle Mouse Click + Drag and rotate with Alt + Middle Mouse Click + Drag. The current world coordinates of the mouse cursor are displayed in the lower right of the window.
¶ Working Map Preview
Map Vault automatically generates preview images for you, if you wish to have a working preview, there are two key things you must do.
- Do NOT host your map online, under the name you will upload it with, without it being in the vault (this will cause everyone online to generate a non working preview and hence when the map is uploaded to the vault, they will have no preview image for that map when it is hosted).
- Delete any preview images in the folder before uploading. (this will ensure the preview is accurate and not of a previous version of the map).
¶ Export / Import
The map editor is able to export and import different parts of the map. In order to do so open the map you want the things to export from or import to. In the top toolbar click on File then Export / Import and you have 5 options:
- Decals - all Decals that are on the map.
- Props - all Props that are on the map.
- Lightning - Lighting settings.
- Water - Water settings.
- Theme - Theme of the map, all strata settings.
- heme exporting is slightly broken, read below how to fix it.
It will ask you to save a new Lua file. Name it whatever you want.
¶ Copy Map Theme
If you like how some other map looks like and you don't want to spend too much time with trying to figure out the best strata and lightning combination, you can copy it quite easily. In order to copy the theme completelly, you need to import Theme, Lightning and Water settings.
¶ Fixing Exported Theme
While the other options work fine, exporting Theme creates a Lua file with broken syntax. In order to import it to your new map you will have to edit the file and fix the syntax so the editor can read it. Open the exported Lua file with any text editor (those that can highlight syntax are better).
This is an example of an exported theme:
strata = {
    'LowerAlbedo' = {'/env/tropical/layers/trop_sand_albedo.dds',4,}
    'LowerNormal' = {'/env/desert/layers/des_sandlight_normal.dds',3,}
    'Albedo0' = {'/env/evergreen2/layers/eg_grass001_albedo.dds',6,}
    'Normal0' = {'/env/evergreen2/layers/eg_gravel2_normal.dds',5,}
    'Albedo1' = {'/env/evergreen2/layers/evgrass010a_albedo.dds',4,}
    'Normal1' = {'/env/evergreen2/layers/eg_gravel2_normal.dds',5,}
    'Albedo2' = {'/env/tropical/layers/trrock006_albedo.dds',10,}
    'Normal2' = {'/env/tropical/layers/trrock006_normal.dds',10.25,}
    'Albedo3' = {'/env/evergreen2/layers/eg_dirt003_albedo.dds',2.5,}
    'Normal3' = {'/env/tropical/layers/trop_rock_normal.dds',11,}
    'Albedo4' = {'',4,}
    'Normal4' = {'',4,}
    'Albedo5' = {'',4,}
    'Normal5' = {'',4,}
    'Albedo6' = {'',4,}
    'Normal6' = {'',4,}
    'Albedo7' = {'',4,}
    'Normal7' = {'',4,}
    'UpperAlbedo' = {'/env/evergreen/layers/macrotexture000_albedo.dds',69.5,}
}
To fix it you need to add [ ] brackets to the first item and , at the end of every line in the strata table. So the result should look like this:
strata = {
    ['LowerAlbedo'] = {'/env/tropical/layers/trop_sand_albedo.dds',4,},
    ['LowerNormal'] = {'/env/desert/layers/des_sandlight_normal.dds',3,},
    ['Albedo0'] = {'/env/evergreen2/layers/eg_grass001_albedo.dds',6,},
    ['Normal0'] = {'/env/evergreen2/layers/eg_gravel2_normal.dds',5,},
    ['Albedo1'] = {'/env/evergreen2/layers/evgrass010a_albedo.dds',4,},
    ['Normal1'] = {'/env/evergreen2/layers/eg_gravel2_normal.dds',5,},
    ['Albedo2'] = {'/env/tropical/layers/trrock006_albedo.dds',10,},
    ['Normal2'] = {'/env/tropical/layers/trrock006_normal.dds',10.25,},
    ['Albedo3'] = {'/env/evergreen2/layers/eg_dirt003_albedo.dds',2.5,},
    ['Normal3'] = {'/env/tropical/layers/trop_rock_normal.dds',11,},
    ['Albedo4'] = {'',4,},
    ['Normal4'] = {'',4,},
    ['Albedo5'] = {'',4,},
    ['Normal5'] = {'',4,},
    ['Albedo6'] = {'',4,},
    ['Normal6'] = {'',4,},
    ['Albedo7'] = {'',4,},
    ['Normal7'] = {'',4,},
    ['UpperAlbedo'] = {'/env/evergreen/layers/macrotexture000_albedo.dds',69.5,},
}
Save the file and it's ready to be imported into your map.
¶ Cutting out part of the map
Sometimes you might want to cut out just a part of a large map and make a new map from it. As an example you can check the map called Shard which is just a part of the original map Shards. The map editor doesn't have any function that would make this simple with few couple of clicks.
- Highlight the area you want to cut.
- Copy the theme, which is described above.
- Decals and props are bit more tricky.
- First delete all decals and props that are outside of the area you highlighted.
- Now select them all and move them as a whole to the top left corner.
- This way you can export/import them to your new smaller map and they will show up in the pretty much the right spot.
- Last thing to do is resource markers.
- Similar as for decals and props, delete all outside of your area and move the rest to the top left corner.
- The difference here is that you can't export them, but they are all saved in the MapName_save.lua file.
- Simple way is to just use the save file from your old map on your new one. Then you will just have to change the amout of armies in the editor.
- Or you can open the save file and just copy paste the markers into your new map save file. All markers are in the MasterChain table.
¶ Heightmap editing
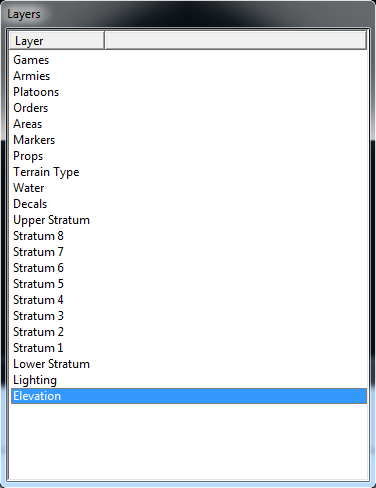
Go to the View menu and ensure that Layers and Tool are checked. If not, check them now. Select the Elevation layer at the bottom of the Layers window:
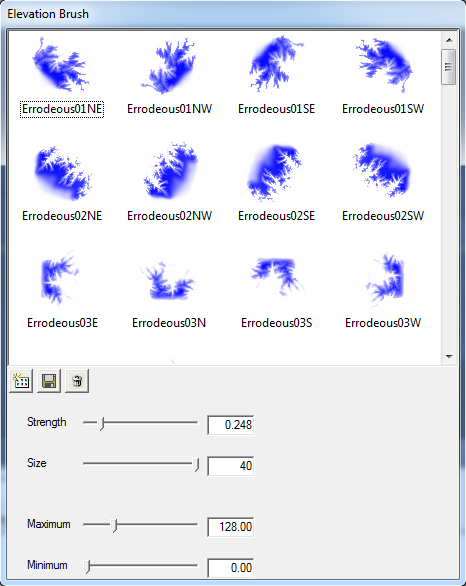
The Tool window should change if Elevation was not previously selected. It should look like this:
- If you dont have any brushes in this window go to Map Editing Tools and get editor.scd file that contains default brushes.
- New Custom Brushes for Map Editor
At the top is choice of all available terrain brushes. The terrain will be raised up or down in the same shape as the brush. Blue means the terrain will be raised, red means the terrain will be lowered. The other options are:
- Strength: How much your brush changes at a time.
- Size: How large the brush is in world units.
- Maximum: The maximum height allowed by the brush. If you are raising the terrain, a plateau will form at the height you specify here. Using a brush on terrain with a higher elevation than Maximum will cause the terrain to be lowered to Maximum.
- Minimum: The minimum height allowed by the brush. It functions the same as Maximum, except that it acts as a lower boundary.
Before you set out to shape the map, it is very helpful to have an idea of what the final map should look like. As mentioned previously, this guide will create a map similar to Winter Duel. Go ahead and open up Winter Duel through File > Open. It can be found in the SCMP_013 directory. If the editor gives you a black screen, simply restart the program. If you encounter this problem frequently, you can start multiple instances of the map editor to switch between maps. Zoom around and pan the camera to get a feel for the landscape.
You should notice that the map is slightly bowl shaped. The terrain begins level where the players start, and gradually slopes downward into a small valley below. This is the first feature we are going to replicate. Smooth slopes such as this are set up by first creating a stairstep pattern. Select the round1k brush from the Elevation Brush window. Set the Maximum field to 65 (remember: our initial elevation is 64, so this will create a step 1 unit high). Draw a line down the center of the map, slightly off to the left. Now set the Maximum field to 66 and repeat, placing a line slightly to the left of the first step. Repeat this all the way to the left edge of the map. The result should look similar to this:
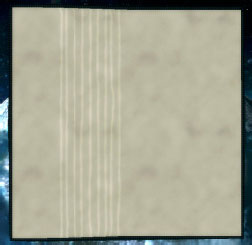
How closely together you space your steps will determine how steep the slope is. The leftmost side of this image has a height of 73; the center has a height of 64. When designing the rest of the map, we need to keep in mind that the final product will be rotationally symmetrical. Although this takes some of the feel and personality away from the map, it does guarantee an even playing field, and that is an important consideration. Additionally, it will make texture and decal placement much easier, as we will see later. Since the map will be symmetrical, we only have to work on the left side of the map. Changes on smooth terrain can be tricky, so we will keep the slope as a stair-step for now. Next we will add a cliff face protruding into the middle, similar to what Winter Duel has:
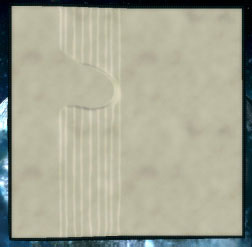
As you design cliffs, you will want to make sure you are actually creating cliffs. Go to View > Debug and click Slope. (Hotkey: O) Green indicates that land is flat enough to construct buildings on. Red indicates that land is too steep for units to traverse. Colorless means that units can traverse that land, but it is too steep to build on.
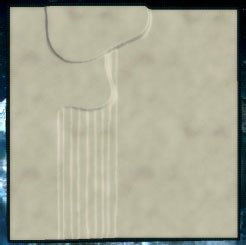
What next? Maps on Winter Duel frequently break into short stalemates in the center with massive defenses on opposing cliffs. Let’s add another cliff above the first to spice things up a bit. This cliff will shadow the one we just added, such that if an opponent can gain hold of it, they will gain a tactical stronghold against the enemy’s defenses. Terrain height is an important consideration when designing cliffs. A height difference of 2 is not passable by units, but such a low cliff is difficult to work with. Cliffs should typically be at least 4 units high. After some tinkering, the result should look similar to this:
The next logical step is to do something with the lower left of the map. However, without visualizing the lower right, it’s difficult to make a good call. This is where Photoshop comes in. With the Elevation tool selected, click the property button ![]() on the top toolbar. Next click on Export Heightmap where your brush choices used to be. Save the .raw file in your map’s directory with a distinct name.
on the top toolbar. Next click on Export Heightmap where your brush choices used to be. Save the .raw file in your map’s directory with a distinct name.
- Note that the editor will not prompt you if you try to overwrite an existing file.
¶ Editing the heightmap in photoshop
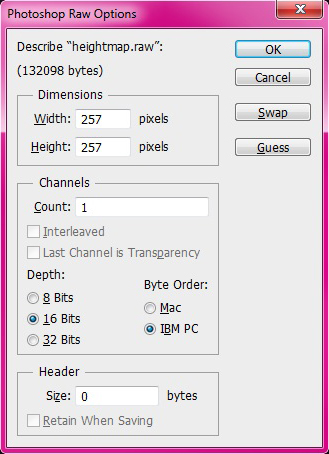
Open up Photoshop (or Paint Shop Pro) and load your .raw file. Important: .raw files do not contain any sort of default header information. It is up to you to supply the image properties. In our case the dimensions are one greater than the world dimensions. If this is not Photoshop’s guess, put in 257x257 as the image size. Make sure the image is loaded as a 16-bit, single channel image. The byte order is IBM PC. The dialog box should look similar to the following:
Select the left half of the image using the marquee tool. An easy way to get exactly half is to choose Style: Fixed Size at the top toolbar. Set Height to 257 and Width to 127 or 128. With these properties set, click on the image. Click inside the selection box and drag it to the left of the image. The selection should snap to the edges. Press Ctrl + C to copy the selection, and then press Ctrl + V to paste it. Press Ctrl + A to select the entire image, and then press Ctrl + T to open up the transformation controls. At the top toolbar, set the rotation angle to 180.0° and press Enter. You should now see a rotationally symmetrical image. If the rotated image did not move over to the right, select the arrow tool and move it there manually. Go to Layer > Flatten Image, then save the image as a .raw file in your map directory. Make sure the byte order is set to IBM PC!
Before importing heightmap back to editor, save your map in case something goes wrong, maybe even make a copy of your map folder. Back in the Supreme Commander map editor, click on Import Heightmap. Load in the heightmap you just saved from Photoshop. Be careful with this feature, because it is not undoable. You should see the following:
The next step is to complete upper cliff we started. Do so on the bottom half so that it gets mirrored to the top next time we go through the Photoshop process. To get back to the brushes, click on the brush icon at the top toolbar or press B. After that, feel free to improvise a little. Experiment with the different brushes and settings to make something interesting, and keep in mind that your map needs to be fun to play. Focus your efforts on the left hand side of the map. When you are all finished, repeat the Photoshop mirroring procedure and load the new heightmap. Hopefully it will look something like this:
Things are shaping up nicely! Now that the basic outline of the map is established, we can smooth it out a bit. With the Elevation layer selected, click the blur icon ![]() at the top toolbar. You’ll notice a selection of four blur brushes. Blur128 and Unsharp128 are good general purpose blurring tools, while unsharp128_hard is great at getting into close areas. Select unsharp128_hard. Go through the stair-steps on the left-hand side of the map and blur them into a single smooth slope. Next, add some ramps to your cliffs by blurring the edges. Once again, repeat the Photoshop mirroring process and load the new heightmap. This is what the map looks like now:
at the top toolbar. You’ll notice a selection of four blur brushes. Blur128 and Unsharp128 are good general purpose blurring tools, while unsharp128_hard is great at getting into close areas. Select unsharp128_hard. Go through the stair-steps on the left-hand side of the map and blur them into a single smooth slope. Next, add some ramps to your cliffs by blurring the edges. Once again, repeat the Photoshop mirroring process and load the new heightmap. This is what the map looks like now:
We’re almost there! There are two things left to fix. The first is that there is a noticeable seam down the middle of the map. This is easily fixed by with the blur tool. Whether or not you use Photoshop to make the map perfectly symmetrical again is up to you. The second problem is a trickier one. If you zoom in on one of the cliffs, you’ll notice that it doesn’t look quite right. It has a noticeably jagged edge, and triangles are either missing or protruding out into the ground below. To fix this, go to the blur tool within the Elevation layer. Select blur128 as your brush. At the bottom you’ll notice a dropdown box. Choose the Impulse option. With a size that slightly extends to either side of the cliff face, run the brush along your cliffs. You can make them look much better with a bit of massaging.
Congratulations, you’ve just completed your first heightmap! The cliffs in this case are not perfect and do show some popping. If you feel particularly ambitious, you can go through and add some small height variations to the map. Flat terrain is convenient for gameplay, but it looks rather dull and a little slope can dramatically improve the look of a map.
¶ Making it playable
Once you have your map set out properly it's always a good idea to try it out and check that the scale is right. To start up a game you need to do the following (assuming you already have the tool window open):
¶ Create start markers
 First we create two markers which serve as the starting points where the ACU's will gate in.
- Open to the Markers Layer (or just press F6)
- Create two blank markers by dragging the "blank marker" icon out onto your map (they should appear in the markers tool window as "Blank Marker 00" and "Blank Marker 01")
- Rename "Blank Marker 00" to "ARMY_1" and "Blank Marker 01" to "ARMY_2" (by clicking on them twice slowly)
- If you double click marker editor will zoom in to that marker so you can see which one you are renaming.
- This is important while making team game map to make sure Even vs Odd Auto-teams will work correctly.
¶ Create armies
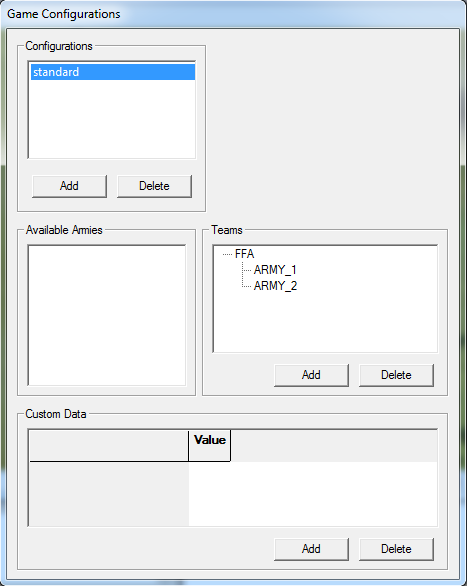 Next we create armies. Defining an army is important for the game scripts, everything a player can control belongs to a specific army. So for a 2 player map, we need 2 armies.
- Open the armies layer (or just press F2)
- Create two armies (click the leftmost new army button)
- Open the games layer (or just press F1)
- Click on "add a configuration" and rename the configuration to "standard" (by clicking on it twice slowly)
- Click on "add a team"
- Drag the two armies ("ARMY_1" and "ARMY_2") into the teams box
What we want to do next is rename the team to FFA, however the editor oesn't work very well here so we have to do it manually:
- Save your work and close the editor
- Go to your
"\Supreme Commander\Map\YourMapName"folder - Open the YourMapName_scenario.lua file with a text editor
- Add the new parts to this file
  Configurations = {
      ['standard'] = {
          teams = {
              { name = 'New Team 1', armies = {'ARMY_2','ARMY_1',} },
          },
          customprops = {
          },
      },
  }}
- Change the "New Team 1" bit to "FFA" so that it looks like this:
  Configurations = {
      ['standard'] = {
          teams = {
              { name = 'FFA', armies = {'ARMY_2','ARMY_1',} },
          },
          customprops = {
          },
      },
  }}
- Save the
YourMapName_scenario.luafile, now the map is playable.- If you want to have working map preview, don't host your map online until its done!
¶ Adding a startup script
We also need to add a lua script file to get the game running:
- Create a file called "YourMapName_script.lua" in the same folder
- Copy and paste the following in (a detailed explanation is in the scripts section)
local ScenarioUtils = import('/lua/sim/ScenarioUtilities.lua')

function OnPopulate()
    ScenarioUtils.InitializeArmies()
end

function OnStart()
end
Finished! You should now see the map in the Supreme commander maps list and you should be able to play it! Please try to do so and if you can, you can skip ahead to the next part. If not, have a look at Further changes to the scenario file. This should help you out (although it's a bit extensive, so just ignore it if you can actually play the map).
¶ Texturing
Summer Duel is awfully bland right now, and it doesn’t represent summer in the least. We need to add textures to the ground to give it some flavor. We will focus on the left hand side of the map just like before. Once that is complete, the right hand side will be created by rotating the textures in Photoshop. Texturing the map is relatively straightforward. Textures are placed in different layers called strata. Stratum 1 covers up the Lower Stratum, Stratum 2 covers up Stratum 1, Stratum 3 covers up Stratum 2, and Stratum 4 covers up Stratum 3. Strata 5-8 are unused.
¶ How to enable all 8 Strata
- Usually 4 Strata are enough for your map but if you feel you really need more you can enable Strata 5-8.
- Click on Lighting layer and change Terrain Shader to TTerrainXP
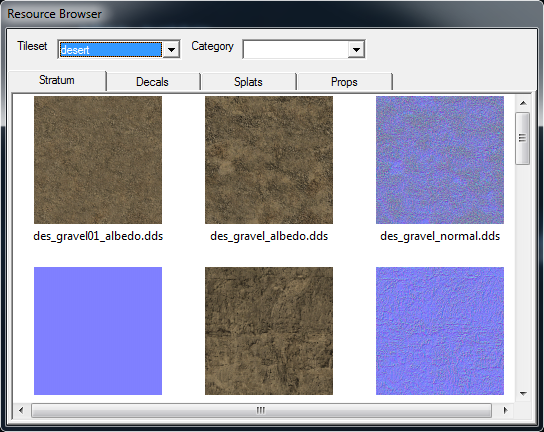 Let’s begin texturing by making the base texture a nice dirt. Select the Lower Stratum layer in the Layers window. Make sure the Resources window is open by checking Resources in the View menu. The Resource Browser should look like the this.
We are interested in the Stratum tab. Select the Desert tileset in the Tileset dropdown. Drag the picture of des_gravel01_albedo.dds from the Resource Browser onto the Albedo picture of the Strata Properties window. You should see a noticeable change in the look of your map. Next drag the picture of des_gravel_normal.dds from the Resource Browser onto the Normal picture in the Strata Properties window. If you are zoomed in closely enough you will see a second change.
Next go through and pick some textures you like for Strata 1-4. The normal part of a stratum is not required, but will improve a stratum’s look by imitating small variations in height. You can adjust the repeat rate of strata across the ground with the scrollbars in the Strata Properties window. The official maps tend to use relatively high repeat rates (low values in the number box). The normal textures are designed to have the same repeat as the color texture, although there is no particular reason they can’t be different. Many of the official maps use mismatching repeats to great effect.
- You can open already done maps and copy their theme by simply selecting same strata.
Now comes the fun part: the actual painting! With a stratum selected (1, 2, 3, or 4), click the brush button ![]() on the top toolbar or press B. This interface should look familiar. Go nuts and paint the left half of your terrain into a work of art. Keep in mind what natural formations look like. For example, cliff faces will typically be rougher surfaces, and flat areas will be covered in grass. Don’t feel bad if it takes you a long time to get it right. This can be the most time consuming part of map creation.
on the top toolbar or press B. This interface should look familiar. Go nuts and paint the left half of your terrain into a work of art. Keep in mind what natural formations look like. For example, cliff faces will typically be rougher surfaces, and flat areas will be covered in grass. Don’t feel bad if it takes you a long time to get it right. This can be the most time consuming part of map creation.
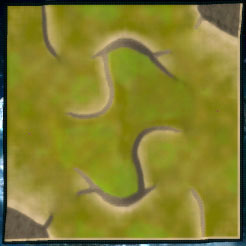 If you like the symmetry of the terrain, you can use Photoshop to mirror each stratum. Click on the Export Mask button in the Strata Properties
 ![]() for each stratum. Save each to a .raw file with a distinct name and rotate them in Photoshop as you did for the heightmap. Then go through and reload them with Import Mask.
for each stratum. Save each to a .raw file with a distinct name and rotate them in Photoshop as you did for the heightmap. Then go through and reload them with Import Mask.
- Important: The terrain texture masks are half the size of your map. For a 256x256 map such as Summer Duel, they will be saved as a 128x128, 8- bit texture. Make sure these settings are correct when you load the masks into Photoshop.
On the right is the new and reborn Summer Duel.
What a difference textures make! Note that unless you have a superhuman power for creating perfectly symmetrical images freehand, there will be a seam down the middle of your map. Minor touchups should correct the problem. Textures don’t impact gameplay, so absolutely perfect symmetry is not required.
Unfortunately, there was an unforeseen problem. Notice the tan strip along the bottom and right of the map. These portions of the map will only be covered by the Lower Stratum, so plan your map carefully if this bothers you. Later on we will see a nice trick (defining an AREA) to hide the ugly truth and make the strips invisible.
¶ Placing resources and props
¶ Placing resources
 Now that the map is technically playable and has some visual appeal, it’s time to place some resources. A little care must be taken to ensure that the mass locations are fairly distributed. A commander should be able to build the four first mass extractors in the same amount of time from both sides of the map. If mass deposits are close enough to allow doubleadjacency, the same adjacency bonuses should be available to both sides. Mass deposits farther away should be the same distance from the starting location. For reference, a factory is 9 grid units wide and tall; power generators are 2.25 wide and tall. The commander build range is 10.
- How to make symmetric mass points.
- Markers can't be rotated or copy pasted, that's why we're going to use props to get mirrored positions.
- Place resources on one half of the map
- Place some props on same position (rocks for example)
- Select them all, either click and drag, or click on them all while having pressed SHIFT
- Go to Prop Edit window (picture below)
- Check Rotare about map center box, set 180 Yaw and click on Set button
- Place resource markers on the other side of map and then don'd forget to delete props under them!
Placing resources is short and easy. Go back to the Markers layer in the Layer window. Drag a Mass marker and position it. Repeat for every mass deposit you want on the map. Hydrocarbon locations can be placed with the Hydrocarbon marker.
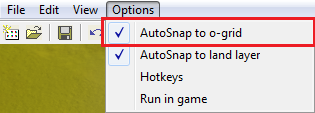
- To make all your resource markers line up correctly with the build grid, select "Autosnap to o-grid" in the options menu before placing them.
- You need to "shake" mass and hydro markers a bit on map to align correctly in grid.
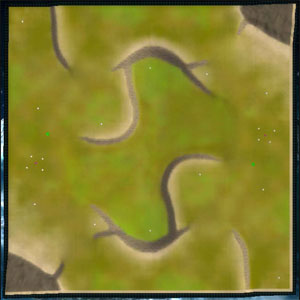
See, easy! Here is a fully functional, enjoyable Summer Duel.
Here is an important note for future reference. The in-game preview for the map as it currently is will show the markers on it, just as they appear above. To get rid of them, check the Hide All Markers box in the Markers layer. Always save the map file with this box checked before you release your map to the public. That way the preview image will be clean.
¶ Placing props
 Every official map contains various props that add a great deal of flair to a map. These include trees and rocks that can be reclaimed for resources. This part is a little tedious, but it will be worth it in the long run.
- For placing props, uncheck Autosnap to o-grid in Options menu.
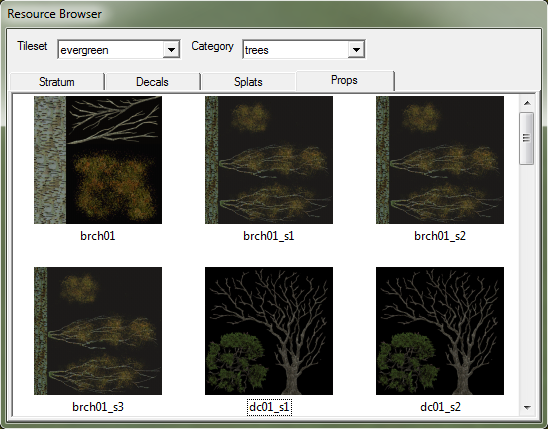
Go to the Props layer in the Layer window. Next, click on the Props tab in the Resource Browser window. Select the Evergreen tileset in the Tileset dropdown and the trees category from the Category dropdown. Go ahead and drag one of the pictures onto your map. You should see appear, along with a blue circle. It looks like this:
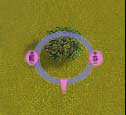
The pink sections allow you to manipulate the prop. Clicking on the E and dragging up and down will allow you to change the prop’s elevation. Clicking on the arrow allows you to rotate the prop. The S is used for resizing other items, but is unused for props. You can move the prop by clicking on it and dragging. Alternatively, holding R on the keyboard will allow you to rotate the prop without clicking; holding M on the keyboard will allow you to move the prop without clicking.
If we had to place each tree individually, we’d be stuck for days at this stage. Fortunately there is a way to place more than one at a time. Pick some trees you like and drag them into the Active props for automatic placement section of the Prop Edit window. You should see something like this:
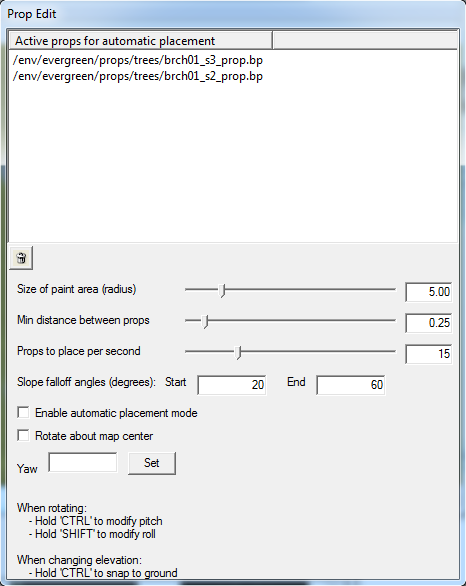
We are going to create a sort of “prop brush” defined by the settings here. What the three sliders do is self-explanatory. Slope falloff angles controls what types of slope your props will be placed on. Setting both Start and End to 0 will require the props to exist on perfectly flat terrain. A range of 0 to 20 is good for getting up close to cliffs without actually placing anything on a cliff. Once you are satisfied with your settings, click the Enable automatic placement mode checkbox.
Moving the mouse over the map will display a circle defining your brush. Clicking will place props at the rate you set in Props to place per second. The actual rate may be lower because this is the number of props the editor attempts to place a second. If Min distance between props is set to a high number, the editor will not be able to fit them all within the brush. If you want to remove something from the brush, select it from the list and click the delete button ![]() . If you placed some props you didn’t mean to, you can either undo (Ctrl + Z) or uncheck the automatic placement mode box, drag a selection around the misplaced props, and press Delete on your keyboard.
. If you placed some props you didn’t mean to, you can either undo (Ctrl + Z) or uncheck the automatic placement mode box, drag a selection around the misplaced props, and press Delete on your keyboard.
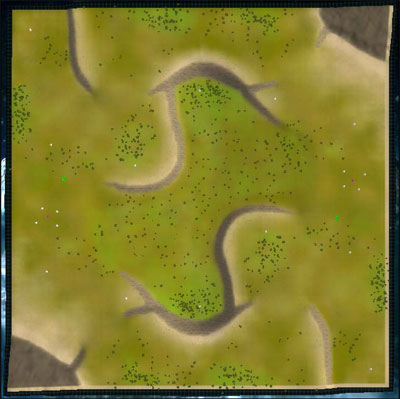
Go through and place trees and rocks on the left-hand side of your map. To make them symmetrical, press Ctrl + A to select all props on the map. Press Ctrl + C followed by Ctrl + V to duplicate every prop. Without deselecting anything, check the Rotate about map center box. Type 180 into the Yaw box and click Set. Feel free to do this with multiple sets of props to give as natural a feel as possible. Here is Summer Duel with its new props:
¶ Adding decals
The difference in visual quality between Low and High fidelity is staggering. Most of the difference is due to decals. Decals are individual textures placed onto the terrain. They can take different forms. Some are placed as images on the map, like the explosion scar from the initial commander warp. Other decals act as normal maps on the ground to give the appearance of roughness. Some of the official GPG maps contain hundreds of decals. If you are serious about your map, this part can be just as time consuming as the heightmap and textures—decal placement makes the difference between a pretty map and a gorgeous map.
Go to the Decals layer in the Layer window. Click on the Decals tab in the Resource Browser window. To add a decal, simply drag it from the Resource Browser window onto the map. The controls to manipulate decals work the same as for props. Holding S on your keyboard will allow you to resize the decal without clicking. Elevation controls are not available for decals. You can create symmetrical decals in the same way as you did props. To get to the Map centered rotation checkbox,click on the arrow at the top toolbar ![]() .
.
If you drag a few decals and zoom around, you’ll notice that some of them fade out much too quickly. You can adjust this in the Decal Properties ![]() window. In the LOD Cutoff box, type in a higher number and click Set. You can also give a decal a minimum viewable distance with the Near LOD Cutoff box. Be very careful with these cutoffs. You want them high enough to be visible at normal zoom levels, but performance will be poor if you have a thousand decals with a cutoff of 10,000. With appropriate cutoffs there’s no excuse to hold back on decals, so make your map look as beautiful as possible!
window. In the LOD Cutoff box, type in a higher number and click Set. You can also give a decal a minimum viewable distance with the Near LOD Cutoff box. Be very careful with these cutoffs. You want them high enough to be visible at normal zoom levels, but performance will be poor if you have a thousand decals with a cutoff of 10,000. With appropriate cutoffs there’s no excuse to hold back on decals, so make your map look as beautiful as possible!
Have no fear if a decal gets buried under others and you can’t select it again. Holding down Ctrl while you click will allow you to cycle through multiple decals on top of each other. You can reorder the decal you have selected with the arrow buttons in the Decal Properties ![]() window (Scrool down). If you want to always see your decals in the editor, go to View > Force Decals.
window (Scrool down). If you want to always see your decals in the editor, go to View > Force Decals.
¶ Lighting
The editor gives you full control of the world lighting Supreme Commander uses. To adjust the settings, go to the Lighting layer in the Layers window. The best way to get the hang of the settings is to experiment. You can create everything from a bright midday noon to a spooky dusk, so have fun! Note that you can scroll down the Lighting menu to get access to even more options.
¶ Water
¶ Redefining water levels or properties
Once you have selected properties for water levels at startup screen of creating new map, you might want to edit them afterwards. You can adjust Water Properties by selecting Water layer from Layers list. You may do some visual changes with brush, or click ![]() icon in main toolbar.
icon in main toolbar.
- Surface: Adjusts overall water level. Higher value will make map "flood".
- Deep: This value is for visual effects only. It is used to adjust level, where water appearance changes from shallow to deep. Value is forced to be less than surface value.
- Abyss: This value is for visual effects only. It is used to adjust level, where water appearance changes from deep to abyss. Value is forced to be less than deep value.
There is also several sliders, which can be used to adjust overall water reflection colour and surface colour.
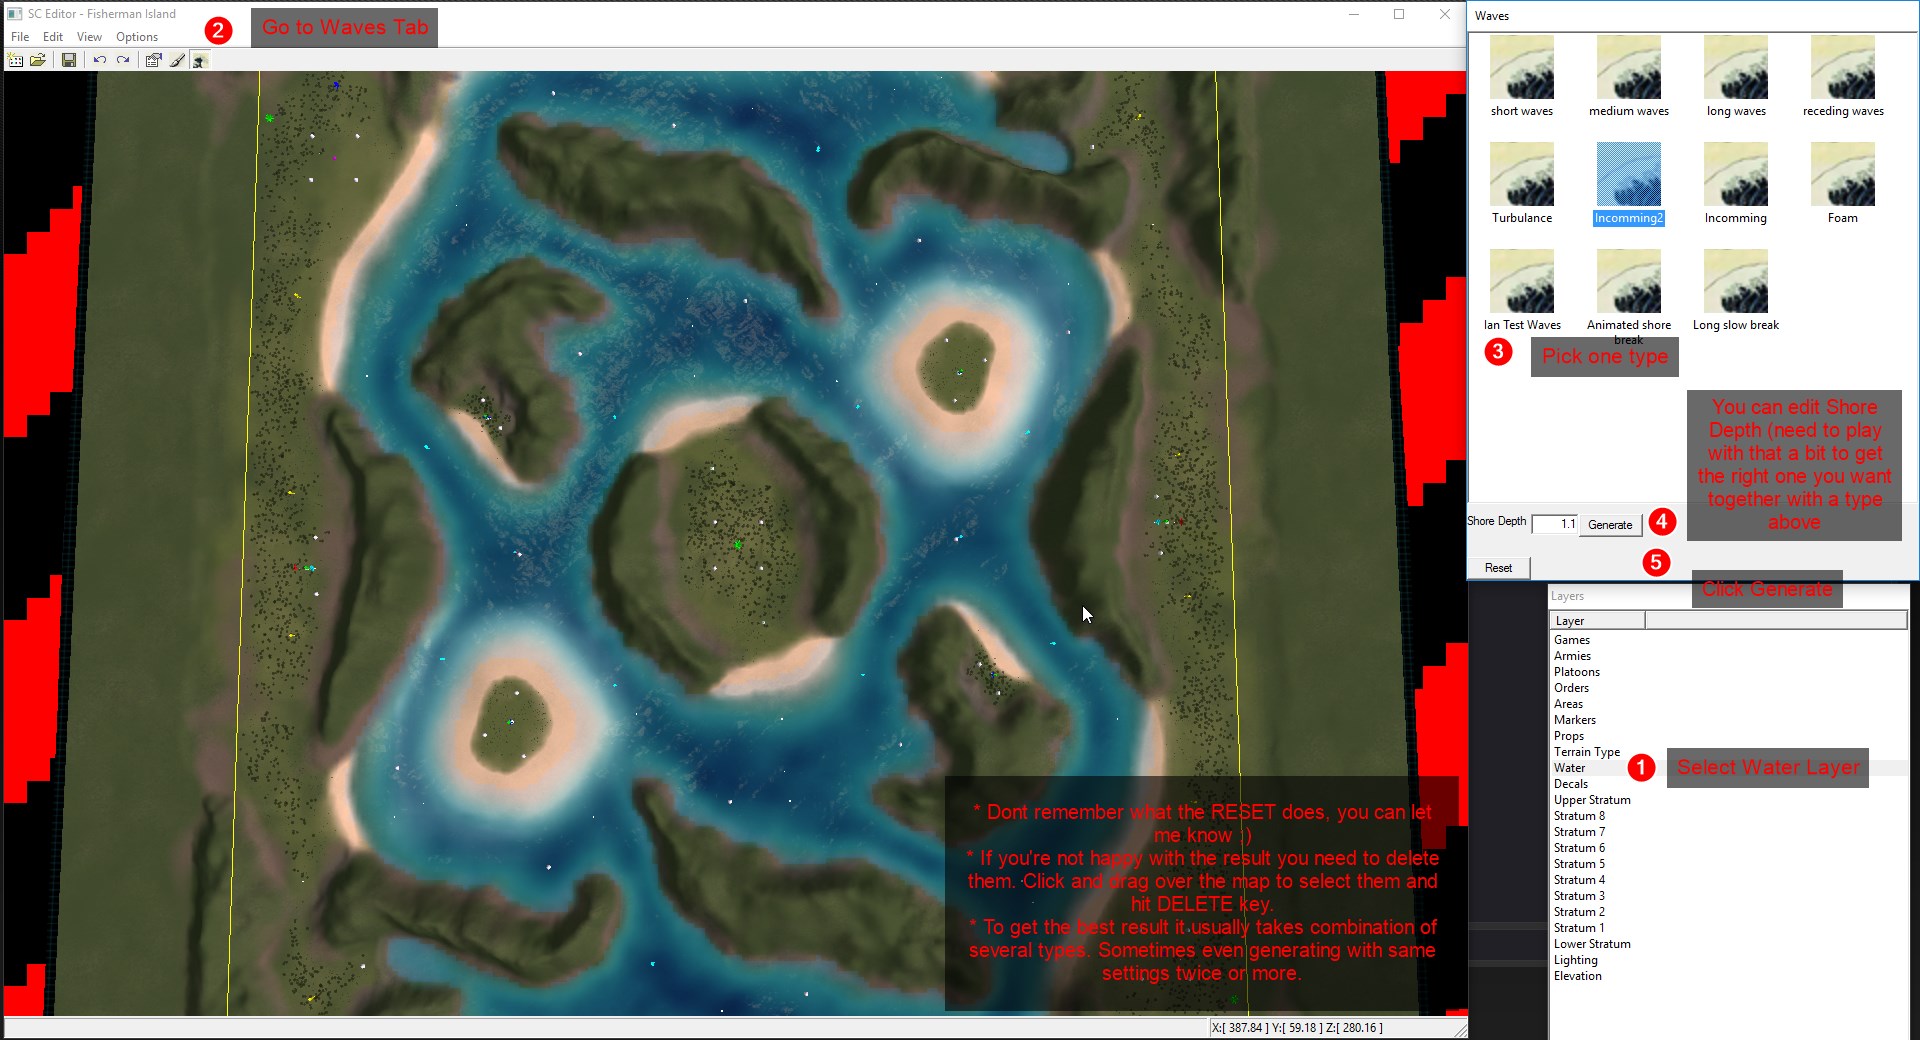
¶ Adding waves to the shoreline
You can finish your water edit by creating waves on the shore.
¶ Fixing Minimap Colours
Since the original map editor is just a pre-alpha version, it can't do all the things. One of them is that it can't save the minimap colours properly. So the minimap in the game is showing the whole map in the shades of grey. To fix this we're gonna use the FAF Map Editor. All you need to do, is to open your map there and save it. Now the minimap should work properly.
¶ Defining gameplay areas
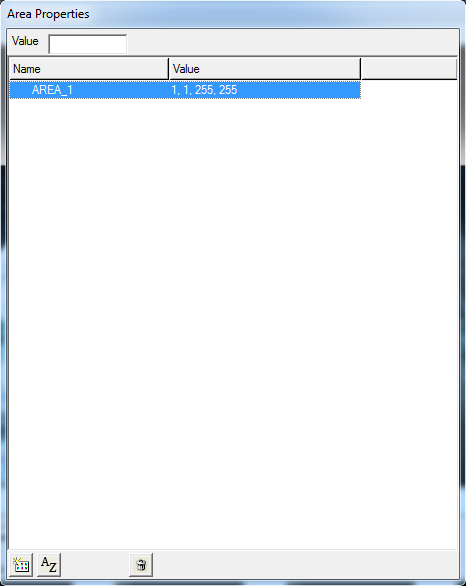 Remember those ugly tan strips along the edges of our map before? We want to get rid of them now, this is pretty easy. It works by defining a gameplay area - everything outside this area will not be displayed. Here's how it works.
Go to the Areas layer in the Layer window. Click on the New button ![]() to create an area entitled AREA_1. Click on the text under the Value column and change it to “1, 1, 255, 255”. The end result should look like this. Areas are always visible when you have the Areas layer selected. To view them with other layers, go to View > Debug > Areas.
to create an area entitled AREA_1. Click on the text under the Value column and change it to “1, 1, 255, 255”. The end result should look like this. Areas are always visible when you have the Areas layer selected. To view them with other layers, go to View > Debug > Areas.
Now we need to edit our map script and add a command to activate the play area. Open your MapName_script.lua file and edit to something like this:
local ScenarioFramework = import('/lua/ScenarioFramework.lua')
local ScenarioUtils = import('/lua/sim/ScenarioUtilities.lua')

function OnPopulate()
    ScenarioUtils.InitializeArmies()
end

function OnStart()
    ScenarioFramework.SetPlayableArea('AREA_1' , false)
end
Shot explanation: The first two lines allow you to make use of other .lua files in your code. The functions OnPopulate and OnStart are called by the game engine when it is time to add entities to the map. The first line within this function tells the scenario to initialize the armies if they are not already done so by default. The second function sets the playable area of the map to the area we defined earlier. If you’ve played the campaign, this is essentially the same code used to expand the playing field after certain checkpoints. Save the file and go back to the editor. Go to Edit > Scenario and ensure that the Script path matches the file you created. Fix it if it does not.
¶ Adding civilians
If you want to add Civilians to your map, go back to the Armies layer in the Layer window. Create two new armies. Click on one and rename it to ARMY_9. Rename the other to NEUTRAL_CIVILIAN. In the Armies window, click on the [+] of NEUTRAL_CIVILIAN to open up the army list. With INITIAL selected, right click on the map and choose a building. This will plop down a building at the location you clicked for the NEUTRAL_CIVILIAN army. If you accidentally deselect the INITIAL group, you can always drag buildings between groups in the Armies window. Place all of the typical civilian buildings in the NEUTRAL_CIVILIAN army. Defensive structures should be placed in the INITIAL group of the ARMY_9 army.
Next we have to tell the game to treat these as civilian buildings. Unfortunately, doing this from the editor causes a crash, so we have to do it manually. Close the editor and go to the MapName_scenario.lua file. Modify the CustomProps section so that it looks like this:
customprops = {
  ['ExtraArmies'] = STRING( 'ARMY_9 NEUTRAL_CIVILIAN' ),
},
Save the lua file and try out the map. If you have problems getting the civilians to appear, make sure you set up the armies properly. If all else fails, open up one of the official maps that contains civilians and compare the setup to yours.
- Color of civilians can be changed by modifying map script using RGB Color Codes.
- Make sure you don't change color to some that is available for players. It would be confusing.
Example for white color:
function OnStart(self)
        SetArmyColor('NEUTRAL_CIVILIAN',255,255,255)
end
¶ Wreckage
Wreckage is created in the same way as civilians. In ARMY_9, create a new group by clicking on the second new button from the left. Rename the group to “WRECKAGE” by clicking on it. Place units around the map with the WRECKAGE group selected. The units initially start alive, which is why they appear so in the editor, but a script automatically destroys them at the start of the game.
¶ Last things to do
Before uploading your map in vault make sure everything is working. Launch your map in skirmish. Take a look at these things:
- Auto-teams are working correctly
- If not, have a look at Start Markers
- All player are spawned
- If not, look again at Making it playable
- All mexes and hydros can be built (+ storages around mexes)
- There are no props on mexes and hydros.
- Delete any map preview from map folder.
- In you have a water on the map, fix the colours on the minimap.
- Map file names (before the extensions) are the same as the folder name or the vault will just say "no valid map datas" or something similar when you try to upload it.
¶ Adding AI Markers
AI markers are optional sets of waypoints to give the AI an idea of how to play your map, otherwise they may not function properly, these markers are placed in the same way as mass or hydrocarbon markers. The entire process of adding AI support to a map using markers can be found in this video. Be warned it takes a few hours to add good AI support to your map: Youtube Video
More generally a page is available summarising other tips for how to create 'AI friendly' maps.
¶ New Map Version
'X' is your version number
- Step 1: Open FOLDERNAME
- Step 2: Go to
MAPNAME_scenario.lua - Step 3: Change the following...
map = '/maps/FOLDERNAME/MAPNAME.scmap',
save = '/maps/FOLDERNAME/MAPNAME_save.lua',
script = '/maps/FOLDERNAME/MAPNAME_script.lua',
To...
map = '/maps/FOLDERNAME/MAPNAME.scmap',
map_version`` ``=`` ``X,
save = '/maps/FOLDERNAME/MAPNAME_save.lua',
script = '/maps/FOLDERNAME/MAPNAME_script.lua',
!!! There is line at the very top of this file that says version =
3, DO NOT CHANGE this one.
version = 3
ScenarioInfo = {
Example:
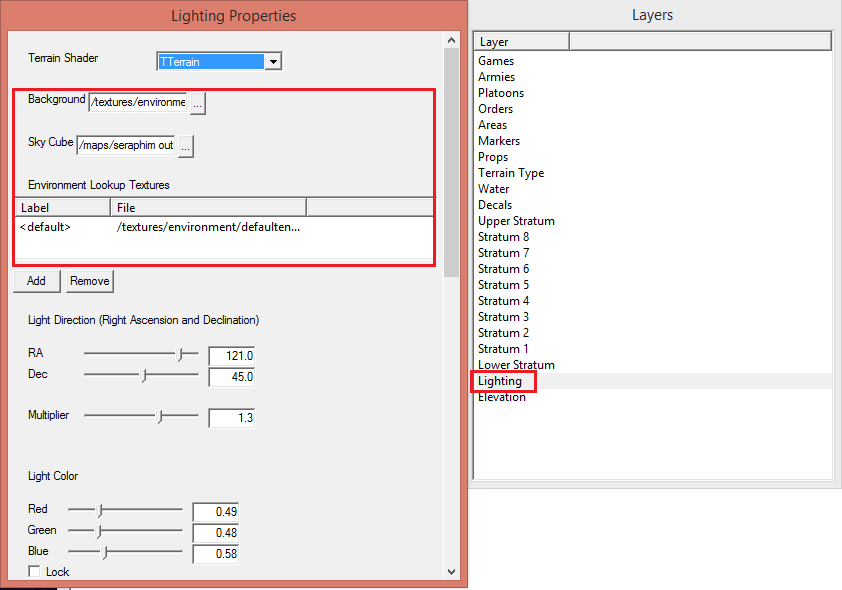
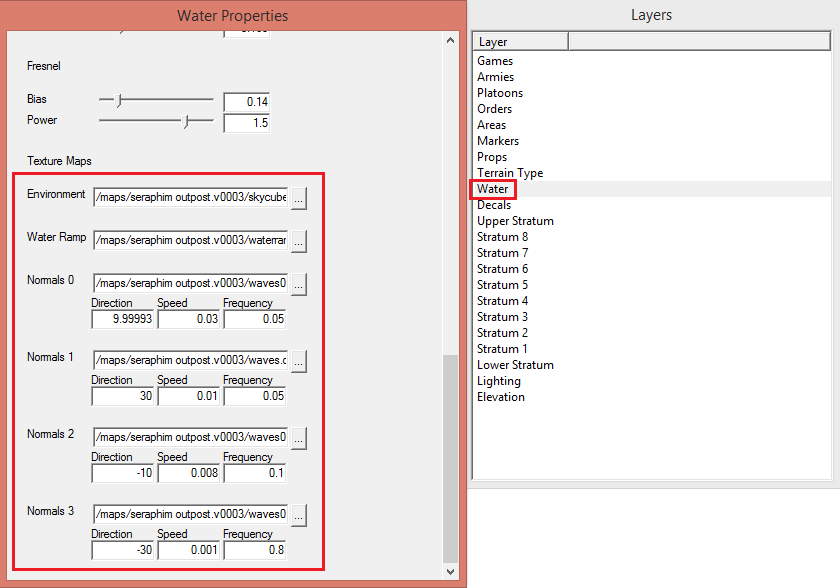
If you were using custom textures, you have to show editor path to textures in newly renamed folder as well, otherwise you will end up with black screen.
There is also this guide by Biass: Making a new map version